Saturday, 25 June 2016

Ken Oliver Color Burst Product Review and Mixed Media Tag

Hi all
I have a product review using the Ken Oliver Color Burst Powders which i think is something my mixed media friends would like. I wanted to experiment with them so i have created a mixed media tag using a mixture of my stash. You can get them from That's Crafty if you are based in the UK and Europe. Here is the link http://www.thatscrafty.co.uk/ .


The powders come in a bottle with a fine tip. This allows more control over where the powder is sprinkled and how much. The best thing about it is that you get to keep your fingers ink free. I created this background by applying water around one side of the tag and tapping the powder on to it. The powder stars to burst out which is a nice effect on it's own. I applied more water to diffuse the powder more and create this watercolor effect.


You can used the powders to create an ink which can be applied to a rubber stamp with a brush. It creates this stained effect which once dry can have further layers to it. I also used the powders to dye the flowers by dipping them into the ink mixture but you could get a patchy effect by wetting the flowers and sprinkling the powders over them.


The Liquid Metals are another favorite as they are like a concentrated paint that covers really well. I used them to paint the MDF Flowers.

Thursday, 23 June 2016

Trimcraft Mirabelle Card Inspiration


Hi all 

I am back with a selection of cards i made using the new Mirabelle Collection. 


For this card i used the Lost Song stamp to create a card topper which i coloured in using the First Edition Marker Pens


The layers are created from paper scraps which i have trimmed and layered up. I then added buttons and ribbon


I used the A4 decoupage pad for the topper and  used simple layers to create this card.


For this card i wanted to experiment with circles so i cut out a few in different sizes and cut a few of the centers out. I then layered them over each other.


I used the All For Love stamp set and i cut it out. The heart i cut out s and then glued to the hand using beading elastic so it dangles.


Thank you for visiting


Thursday, 16 June 2016

Trimcraft Santoro Mirabelle 2016 collection A4 Scrapbook page

Hi all

I have a layout i made using the new Mirabelle Collection.


I used the A4 paper pad as the base and then cut a wide strip of the floral paper and adhered that to the page as the first layer. I used the Short Circuit stencil from  DecoArt for the background.


I then cut two strips of paper 3cm wide and stuck them behind the photo. I used the glitter boarder from the glitter frames pack and cut it in half to create another layer.


I used the large paper flowers and buttons to decorate the page.


Tuesday, 14 June 2016

DecoArt Blogger Outreach new and improved Steampunk Draw Unit

Hi all

I revamped my multi draw unite by adding a layer of Weathered Wood crackle medium to the draws and then painting the, over with Quinacridone Gold Fluid Acrylic. I then rubbed Copper Kettle Metallic Lustre around the edges.

i am playing along with the following challenges

andyskinnerorg.blogspot.co.uk  there are the tutorials to the two techniques i used on my project here as well.

sandee-and-amelie.blogspot.co.uk

The MDF shapes and draw unit are from Things to Alter


I decorated the draws with cog charms and MDF pieces. I rubbed more Copper Kettle over the handles as well.


I used Andy Skinner's Letting Off Steam Clear Stamp Set . i used the large Clock and Circuit stamps to create the detail.


The giant cog has been rusted using a mix of orange and brown Crafters Acrylics with cinnamon sprinkled on the wet paint to create texture. I then painted it with  Quinacridone Gold Fluid Acrylic around the edges and rubbed a bit of Copper Kettle over.


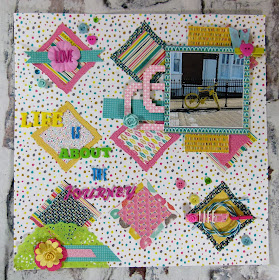
Trimcraft Scrapbook Feature June: Geometric Shapes And Bright Colours


Hi all 

Here is my layout i made for the Trimcraft blog. You can find the full tutorial here http://www.trimcraft.co.uk/articles/layered-first-edition-pick-n-mix-scrapbook-layout-workshop


This is my favorite bit. I love experimenting with the letters


The bright colors really pop put against the pale background.


Thank you for visiting


Gecko Galz DT Blog Focus June: Invent Canvas


Hi all 

I am back with a canvas made using DecoArt products and a Gecko Galz Digi stamp from the Arsenic and Lace Craft Kit.


I started off by priming the the canvas with DecoArt White Gesso and then  used the Andy Skinner Snake's web and Circuit stencils with the white modeling paste. I then painted over it all with Dazzling Metallic Black Pearl. I dry brushed Rose Gold and Silver Spark  Metallic  Lustre over the embossed bits.


I coloured in the digi with First Editon markers, using ivory on the detailed side and Pale grey on the bone. I rusted up the MDF by mixing Orange and Brown Crafters Acrylic and adding cinnamon powder on to them before it dried. You can either leave it as it is or apply more paint over it.


I used the Honey Comb MDF Mask for the center which i painted with Silver Spark Metallic Lustre.


Dry brush Copper Kettle Metallic Lustre over the raised part of the cogs to get a corroded effect


I used the Sand Texture Pasted on a few of the Large Cogs and painted them with Peal Black metallic paint and added  Quinacridone Gold around the centre and edges to make it look rusty.


I found these glass eye cabochons on Ebay which add a Gothic effect to things

And here is your free stamp of the month. The full collection is available for free on the Gecko Galz Blog over here http://geckogalzscrapbooking.blogspot.co.uk/


Thank you for visiting


Saturday, 11 June 2016

DecoArt Blogger Outreach Program Steampunk Mini Draws


Hi all

I have altered the six draw unit from Things to Alter. I first painted the whole unit with Heritage Chalky finish paint. 


This was my first attempt at stamping into modeling paste. You need to dry the surface of the paste first so that it is set on top but still soft. Then you wet your stamps a little and press them into the paste.  I used Andy Skinner's Letting Off Steam Clear Stamp Set . i used the large Clock and Circuit stamps to create the detail.


I painted the draws with Burgundy paint and the dry brushed it over with Gold and Bronze Dazzling Metallic paints. The compass i painted up by mixing orange and brown to make a rust color. I then used cinnamon to add texture.

                                                   Thank you for visiting

i am playing along with the following challenges

andyskinnerorg.blogspot.co.uk  there are the tutorials to the two techniques i used on my project here as well.

sandee-and-amelie.blogspot.co.uk

Friday, 10 June 2016

Susan K Weckesser Creative Team introducing the new Color Pop Minis Co branded with Clearsnap

                                               Hi all

I have two exciting pieces of news to share the first being that i am returning to Susan's creative team and the second is a brand new product release designed for all those who love mixed media and colouring. The new inks once dry will take anything you throw at them inks, watercolours, paints the lot. The other thing you can do is stamp them onto smooth card and blend in the ink like watercolour inks. You can win a set by visiting Susan's blog here http://mysweetearth.blogspot.co.uk/2016/05/brand-new-color-pop-minis.html?m=1


                            There are 8 colors available which you can see below


I used the In Circle Me stamp set on the background and coloured the circles in with Prima Oil Pastels.


I used the A Little Bit Washi to create the ribbons and the Bunny Hugs stamp set for the bunny and sentiment. 


The Card was made using an A6 card blank which i stamped over using two colors of the Color  Pop Mini inks. The Fresh and Ice Blue. I used a water pen to blend the ink into the cards background.


All the ink colors can be mixed with water and used as a paint even the Shimmer ink with blend.


I colored the kite in using the Color Pop Minis inks which i dabbed onto an acrylic block and blended with a water pen.


Thank you for visiting

Tuesday, 7 June 2016

Trimcraft Belle and Boo Cards


Hi all

I have a few makes to share using the new Belle and Boo collection.


I made this card using the Ballerina stamp set which i coloured using First Edition Markers.


I made the anchor ornament by painting the large MDF Anchor from Things to Alter. I then used the Ice Cream stamp set to add the characters.

Monday, 6 June 2016

Oak House Studio: Introducing The New Bigger Texture Stamps

Hi all
I am up on the Oak House Studio Blog with a new layout and I have some new texture stamps to show you. These are the larger versions of the texture stamps that come with the Double Daisy set but now are a good size for mixed media projects. The stamps are available to buy here http://www.oakhousestudio.com/ourshop/prod_4936011-Mixed-textures-stamp-set.html


I started my page off with some stenciling around the layout using texture paste mixed with Peacock  Pure Colour Chemistry Ink. I used the Ledger Sheet stencil mask by The Crafters Workshop and added the texture randomly around the page. I then Flicked Sapphire Acrylic Ink


                            I added some lace trims to my page and dotted around a few pearls


I cut up a couple of sheets of Gypsy gypsy paper pad and cut out the postcards. I distressed the edges and added stenciling on them before layering them up.


I took the texture stamps and stamped them around the page and over the stenciling. I used Vintage Sepia and Cobalt Blue Colour Chemistry Ink Pads.


I added more of the texture past around the scrabble tiles to distress them


Thank you for visiting