Wednesday, 31 August 2016

Things To Alter Seaside Layout With 12 x 12 MDF Blank Circle


Hi all 

This is my last official post as design team member for Things to Alter. It was decided that the challenge blog wasn't getting enough entries and it was taking a lot of Jac's time to organize so for the time being she is focusing on running the online shop.  I wanted to say a huge thank you to all the guest team that i have worked with over the last few month. I really enjoyed seeing all your creations. 


I used the 12x12 Circle as the base because it is great for holding wet mediums.  I painted the base in gesso and used the DecoArt Stencil to add the first layer and then used Turquoise Color Burst powders to add a vibrant blue color.


The frame is the Geoclusters Bubble Frame and i added a couple of the seaside shapes.


I used Craft Consortium Gypsy Gypsy with Kaisercraft collectibles for the layers and added a bit of trim.


the picture is of my Nan and i am not sure where which seaside location she is but it might be Skegness.


                                                            Thank you for visiting

Tuesday, 30 August 2016

DecoArt Blogger Outreach Program: Sea Song Altered Plaque and Process Video Using Susan K Weckesser Spirit Of Mermaid Stamp Set

Good evening
Hope you all had a lovely bank holiday break. I have a mixed media project to share today using the new stamp set called Spirit Of A Mermaid by Susan K Weckesser. Definitely another one for the favorite list.


I started off by painting the base with gesso and then a mixture of blue Crafter's Acrylic paints. I then used the A Little Bit Washi Stamp Set and a stencil to add texture.


I colored in the image with alcohol markers. I wanted her to look like a well known mermaid with red hair. 


I used DecoArt Metallic Luster on the seahorse and fish. I also rubbed a bit onto the stencil to bring it up.


I have a process video to go with the project.


Thank you for visiting


Sunday, 28 August 2016

Crafters' Palette DT: Scrapbook Tutorial Using Kaisercraft Ma Cherie Collection.


Hi all 
Here is my first project and tutorial for the Crafter's Palette team. I used a mixture of Tim Holtz and Kaisercraft products which are tow of my favorites. 


Take a 12 x 12 sheet of pink Brazil Basics Card Stock and apply modelling paste around the edges using the Tim Holtz Gothic Lace Stencil.
Once dry, Rub over with Victorian Velvet Distress Ink and rub a bit along the edges of the page and corners.
Stamp over the corners and edges using Kaisercraft Texture Stamps in Black Soot and Worn Lipstick
Cut a 7 x 5 rectangle and mat your photo onto it
Cut a larger rectangle about 9 x 7 and adhere to page
Adhere photo to edge of rectangle using 3D foam pads


Cut a few strips from patterned paper and trim in half, Slot these behind the photo.
Take the Ma Cherie Collectibles pack and slot the large flower die-cuts along the side of the photo. Cut the largest one in half and slot either side of photo.


Take a tag die-cut and slot it at the top of the photo, Spritz a few white paper flowers with magenta mister and adhere in clusters around page. Add a few Butterflies with pearls in the centers.
Cut the strip off the bottom of the 12 x 12 sheet and use the patterned side to create a few paper ribbons. Adhere these to top and bottom of page.
Finish layout with a sentiment topper for the title and a few more flowers.


Thank you for visiting.

Friday, 26 August 2016

Gypsy Gypsy Weathered Wood Card and Video Tutorial

Hi all

I have been thinking really hard lately about where i want to take my creative journey in the next few months. I looked back from the beginning and i have come really far since then but i looked at my style and decided that there are two distinct areas i really shine in which are mixed media and vintage so i want to focus on those styles. I also want to take this blog in a new direction starting from next month and make this  blog more inspirational and more interactive so i will be including more tutorial based projects and i will be learning to create the dreaded tutorial videos. In October i will be launching my very own monthly sketch challenge and there will be more scrapbook layouts going on the blog too just like there used to be.


So today i have been playing with the gorgeous Gypsy Gypsy paper pad by Craft Consortium and i love the vintage style prints on this pad so this really suits my style. I started off by taking two sheets of paper and covering half of a 6 x 6 card with each color.Next i took the really bright floral sheet and cut a 4 cm x 4 cm square and turned it on it's side to create a diamond shape. I then printed out my image which is a preview of one of the free sheets i will be giving out as part of the Gecko Galz blog hop in October.


I painted up a wooden frame using black gesso as the base and then i added a layer of Weathered Wood Crackle Medium over it once dry. Then i painted DecoArt White Crackle paste over and left it to dry. I learned this technique of Teresa Morgan and you can see a more advanced version on her blog http://www.thefatcactus.co.uk/?p=5368  but i kept it as it is to give it a more worn look. I then trimmed my image to fit inside the frame and added a wooden butterfly to finish the topper. 


I have a basic video here showing how to get the crackle effect


I added a doily to the center of the card and the a length of lace before sticking the frame down. I then finished the card off by using the rub on stickers that come with the paper pad.

Thank you for visiting


Thursday, 25 August 2016

Trimcraft Simply Creative Play Days Cards and Step by Step Instructions

Hi all

I have a few bright and fun cards to share using the Simply Creative Play Days paper pads.


  1. Cover a 6x6 card blank with the rainbow stripe paper
  2. Cut the 6x6 rain drop patterned paper in half, Use a boarder punch to add a lace edge  and stick to bottom of card.
  3. Cut a 4cm wide strip of Rainbows patterned paper and stick to bottom of the card
  4. Using the Princess Die Set, Cut out three unicorns from pink and purple card stock and stick them along the card.
  5. Stick a pink doily in the top right corner of the card and trim
  6. Add a sentiment topper to finish card

  1. Cover a 6x6 card with patterned paper
  2. Stick another piece of paper over the top of the card at and angle and trim
  3. Cut a green doily in half and stick it to the side of the card
  4. Add another layer of paper to the top by placing it at an angle and trimming it down
  5. Cut out the bunting from the Dovecraft cutting dies collection.
  6. Glue the bunting onto twine and once dry staple the banner to the card
  7. Add a sentiment and a few sequins to finish


  1. Cover a 6x6 card in patterned paper
  2. Take another sheet and glue it to the card at and angle and trim to fit
  3. Cut two flags out of patterned paper and layer up 
  4. Cut out a circle and adhere to centre of the flags
  5. Cut out the rocket from blue card
  6. Add a few sequins and a sentiment
                                          Thank you for visiting

Tuesday, 23 August 2016

Trimcraft Simply Creative Lavender Dreams Cards


  • Using a 6 x 6 square card blank, cover the whole card in a sheet of 6 x 6 patterned paper .
  • Cut another sheet about 8 cm wide and glue to edge of card.
  • Cut out a large scalloped edge circle and glue to center of strip.
  • Using the Buckles, Frames and Boarders die set, Cut out the thin heart boarder and glue across the circle.
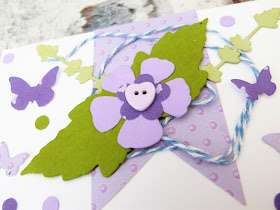
  • Cut out the cut out the flowers with steams from the Nature Die Set. Cut two out in green card and two in purple. Cut the flowers off the purple ones and glue to the green ones.
  • Adhere the flowers to center of the circle
  • Cut out a pair of leaves and adhere over the flower steams
  • Cut out a large butterfly and adhere to center of the circle. Add a gem to the center
  • Finish card with a sentiment 


  • Take the ribbon card blanks and cut two strips of purple paper about 1.5 cm wide. glue these to the back of the card where the ribbon would slot through.
  • Cut a 4 cm wide flag from lilac paper and glue off center to the top of the card.
  • Cut out a selection of leaves and foliage from green card stock.  I used the Nature die set.
  • Take some twine and create a rough loop.
  •  Place this over the flag and glue into place.
  • Adhere the foliage to the center of the flag starting with the thinner steams and layering the leaves over the top.
  • Cut out a few flowers and place the large one over the top of the leaves and add a small flower in the center.
  • Cut out a few small butterflies and dot them around the center of the card.
  • Use a hole punch to create the little dots from the scrap paper.
  • Finish card with a sentiment sticker.


  • Using a 5 x 7 card blank, Cover half of the card in a dark purple paper and half in pale purple.
  • Using the Borders die set, cut out a wide border and a thin boarder. Trim the wider boarder in half and glue to the center of the card.
  • Cut out a scalloped circle and adhere to center of the card.
  • Adhere the thin boarder across the circle.
  • Cut a doily from pale patterned paper and adhere to center of the circle
  • Cut out two lots of foliage from green card stock.
  • Take the leaves and a purple flower from the Simply Creative collection and adhere them to the center of the circle. Take the two die cut leaves and slot them between the leaves.
  • Cut out two small flowers from the Nature die set and place in the middle of the purple flower. Add a mini bow and button.
  • Finish card by cutting out another boarder and cutting this in half. Adhere to the corners of the card and decorate with flowers and buttons.
  • Thank you for visiting

  • Sunday, 21 August 2016

    Life in a Snapshot Sketch Challenge DT Call

                                                            Hi all

     I am looking for a few people to join my Sketch Challenge team. 

    I am looking for people who love to craft and work with a team of like minded people

    You need to be active on social media

    You don't need a blog if you have a Facebook Artists page that is ok

    I need you to comment on the challenge entries 

    I only need one project a month using the sketch provided 

    Challenge goes live on the 1st October so plenty of time to get something made up


    I  can offer the DT a discount to use for Things to Alter 

    Promotion of their work on social media

    The opportunity to create projects in a stress free environment

    If you would like to apply send me an email katielamb20@hotmail.co.uk with three projects and tell me a bit about yourself.


    Saturday, 20 August 2016

    Susan K Weckesser Creative Team: Art Journal

    Hi all 

    I have another art journal page to share using Susan K Weckesser Stamps and Clearsnap Color Pop Mini Inks. It is a simple [age that i started off by using the Sky and Ice inks to paint a blank page a two tone color. I blended them in a little so it didn't look too clean.


    Next i stamped the Itty Bitty sentiment in the middle and colored it in with the Color Pop Mini Inks.


    I then used the In Circle Me stamp and i inked just around the one edge of the stamp before applying it around the edges of the journal. I then colored in the circles with the Color Pop Mini inks.


    Thank you for visiting. 


    Friday, 19 August 2016

    Sticker Kitten DT Birthday Dinos: Learn How To Make A Layered Flower Card.


    Hi all

    Just a quick little card to show you.

    I used the new Sticker Kitten Birthday Dinos paper pad and made a flower card. I bet you didn't think of that one eh? The pad has plenty of non Dino themed papers that are great for use on Thank you cards or for an older recipient. You can pick up your pad here https://www.etsy.com/uk/shop/StickerKittenDesign


    1) take a cream A6 card blank and add a strip of green paper along the bottom
    2) Using a selection of mini scalloped circle dies, Cut out a mixture of shapes from the patterned paper and layer them up.
    3) Glue three lots of bakers twine down the card and adhere the circles over the top
    4) Using a scalloped circle punch (Xcut Large), Punch out two circles in green and cut them in half to make leaves.
    5) Add sentiment and decorate with resin flowers.

    Wednesday, 17 August 2016

    Trimcraft Simply Creative Life's a Beach Take Me To The Beach Scrapbook Page


    Hi all

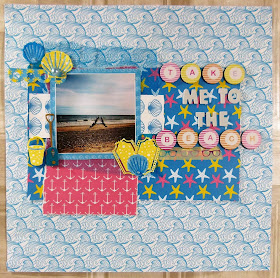
    I have a bright Seaside layout for you. The page was inspired by my need to get to a beach any beach and soon. I am counting  down to my holiday so crafting with this collect brought back a few memories.


    Take a 12x12 sheet and cut another 12x12 sheet into a 24 cm by 14 cm rectangle and adhere to center of page.
    Cut another rectangle 16 cm by 10 cm and tear down the edges, rough it up a bit more using scissors.
    Adhere this down the page by the edge of the large rectangle
    Mat the photo onto patterned paper and trim around it to leave a boarder
    Glue a bit of netting over the layers
    Cut a 4cm by 15 cm strip and place  over the net
    Add a few strips of summer themed washi tape along the middle of the page.


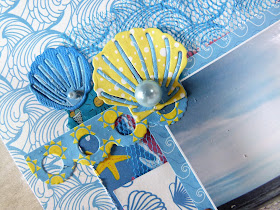
    Decorate around the photo with die-cut shells, tickets and bucket and spade
    I used washi tape to add a bright pattern to the spade


               Finish off by adding the title with a mixture of Simply Creative Alphabet stickers.


    Tuesday, 16 August 2016

    Announcing The Winner of #createyourownrainbow Contest


    The winner of the set of Susan K Weckesser designer Color Pop Mini Ink pads is Jean. Please Email Susan hello@susankweckesser.com with your address so we can get your prize out to you. Here is the original post https://whatkatiedid2.blogspot.co.uk/2016/08/susan-k-weckesser-create-your-own.html?showComment=1471374363757#c3284819475492425313 Winners are selected by Random.ORG

    Thank you all for joining in


    Sunday, 14 August 2016

    Gecko Galz Blog Feature August and Free Stamp

                                              Hi all
    I am sticking with the nautical theme as we approach Midsummer. I Used the new Nautical collage sheet to crate the card bellow.


    The background was created using Ken Oliver Color Burst Powders and a stencil. I then used the papers from the Seaside Splendor kit and teared the edges, Next i layered up the toppers i had cut out of the Alter it collage sheet 


    I used stamp set is from Kaisercraft


    Thank you for visiting

    Here is your free stamp of the month.


    Saturday, 13 August 2016

    Making Cards Magazine Debut Nautical Ideas feature


            Hi all

    I am back with some exciting news to share. My cards  have been published in Making Cards Magazine August Issue.It is my first feature for them and i hope the first of many. I love to see my work in print as it  feels like have achieved something,  I used the MDF nautical shapes by Things to Alter. You can find a full tutorial in the magazine so i will just mention a few things here.


    The papers are from the Gecko Galz and are part of the Seaside Splendor kit. They are digital papers so print them off a bit smaller then A5 to get the proportions correct.


    ]

    I took the portal and painted it using a mix of DecoArt Crafters Acrylic in Mocha and orange. It doesn't matter if the paint is fully mixed as rust is a mixture of tones. The rough look is created by sprinkling on cinnamon powder while you add the paint. Once dry i rubbed it over with DecoArt Metallic Lustre Copper Kettle.


    I love to add shelf adhesive pearls to the shells because it gives them a vintage feel


    A close up of the rust effect


    My second card was created by layering up the Crafters Acrylic and then going over the dry paint with weathered wood. I then repeated the process to get the peeled paint.


    The flip flops by Clearly Besotted are so cutr


    I think this is my favourite mainly because i love lighthouses and no trip to the seaside would be complete without them.


    Again i used the combination of Crafters Acrylic an weathered wood to create the peeled effect.


    The circle is plain blue card stock  that i rubber Turquoise  Metallic Luster over to tone down a bit.


    Thank you for visiting