Saturday, 30 September 2017

Little Crafty Bugs Rosey Nosey Rudolph Craft Ideas

Hi all

I was recently sent a small Rosey Nosey Rudolph kit and was asked to blog a few ideas on how to use the kits. They are available from the Little Crafty Bugs website below.


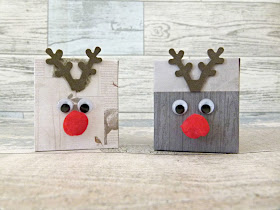
The first idea i had was to create little whimsical reindeer tags using the Rosey Nosey Rudolph kit. I covered a blank tag with velum and then cut out a smaller tag using a die cutter and glued that to the centre. next i used a egg shaped nesting die to cut out the head from felt and glued it to the tag before adding the eyes,nose and antlers.


I used a box template to create these little boxes that can be used to keep little gifts in. The reindeer faces  add a whimsical feel to them

Thank you for visitng


Thursday, 28 September 2017

Learn How To Create This Entangled Octopus Time Card

Hello

I have a steampunk themed card made using the Octopus Time stamp set.


Cover a 6 x 6 blank card with brown paper and the half with pattetened paper.

Cut out a large hexagon from faux print style paper and glue to centre of card.


Stamp out the octopus lady onto white card using a purple ink pad. Use sepia coloured ink to colour over the white areas and then adhere to the edge of the hexagon. 


Stamp out the cog cluster onto card and colour in before cutting out and adding to the corner of the card.


Finish by adding a witty sentiment.

Visit our Facebook group for more inspiration

Tuesday, 26 September 2017

How To Create Cheap,Quick And Easy Craft Room Storage


Hi all

I am back with a tutorial showing you how to create a quick and easy set of draws using  mini draws found in the local craft store and Best Glue Ever.


To start off you need a set of wooden draws like these ones https://www.theworks.co.uk/p/home-decorations/decorate-your-own---twin-drawers/5052089204768

Coat them in gesso so that the top coat of paint is easier to apply. 


Paint the draws  fully and leave to dry before using rubber stamps to create a pattern.


Once the paint has dried off, Apply Best Glue Ever to the side of each pair of the draws. Glue them together and allow the glue to set.


Next appy Best Glue Ever to the feet of the draws and stack them on top of each other. This glue bonds strong with wood and will hold everything in place which other craft glues struggle with.


Thank you for visiting


Sunday, 24 September 2017

How To Create A Magical And Charming Christmas Tag

Hi all

I have a Christmas tag to share today.

White card
Green ink pad
Black ink pad
Green texture paste
Green ink
Red ink
Gold paint
Stencil
Modelling paste 


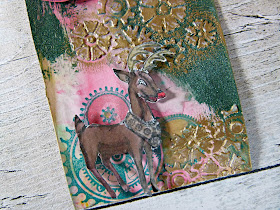
Take a blank tag and spray with red and green spritzing ink.

Use a palette knife to apply green texture paste to edge of tag.

Stamp the large cogs on to the top and bottom corners of the tag.

Apply a stencil and paint over with gold paint.  


Stamp out the reindeer and sentiment onto card. Color them in and cut them out. Add the reindeer to the corner and sentiment to the center.


Add a little metallic paint to the cogs


Thank you for visiting


Saturday, 23 September 2017

Cherish the Memory Woodland Winter Christmas Cards

                                                                Hi all

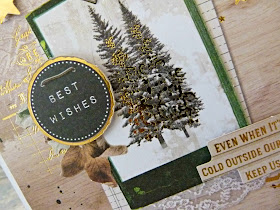
I have made up a few cards using the card kits available at Cherish the Memory. They are easy to make up and come with lots of extra bits which can be used on other projects. This one is called Winter Woodland https://www.etsy.com/uk/listing/556329215/woodland-winter-die-cut-block-for-card?ref=shop_home_active_3


The kits are designed to fit most 6 x 6 and A6 cards


I love the golden foil accents with this kit.


There are many different pieces which can be mixed and matched to make the cards more unique.


Use 3D foam pads to add dimension to the cards


Thank you for visiting


Tuesday, 19 September 2017

A Spell Binding Halloween Card Preview

Hi all

Here is a peek of a spell binding project i made for Sin City Stamps
Here is the full article 


Thank you for visiting

Sunday, 10 September 2017

How To Create Adorable Kori Kumi Mixed Media Cards

Hi all

I have some exciting news to share!!

I have joined the Craft Consortium Design Team and i am excited about the year ahead.

While i work on the new collections, i have a few mixed media cards i made up using the Kori Kumi Collection.


Start off by covering a 5 x 7 card and then use a flower stencil with modeling paste to apply a layer of embossed flowers over the card.


Spritz the card with water and sprinkle over Brusho Powders and dab the ink with a paper towel.


Pop out the pieces from the decoupage sheets and make them up but don't stick them onto the base layer. Adhere the characters to the corners of the card. 


Add a sentiment using a die and white card.


Spritz water over the 5 x 7 card and then sprinkle Brusho Powder over the card.
To get the faded effect by using a pale green first and then applying a darker green over the top as each layer dries.  Stamp textures over the card using stamps and then build up the topper.


Cut up a few strips of paper from the 8 x 8 pad and layer them up before adhereing them to the card. Add a bit of the leaf ribbon just on the edge of the paper layers.


Add a sentiment by cutting out the words in craft foam with a die cut. Finish off by adding enamel dots.


Thank you for visiting


Saturday, 9 September 2017

How To Create A Warm Autumn Card

Hello crafty friends
I have a mixed media card to share with you today. The theme on the Colourcraft blog is Autumn colours so i will show you how to create this look with Brusho Crystal Powders.


Take a blank card and open it up. Place newspaper over the half you want to keep blank and then spray the other side with water. Sprinkle Rose Red across the card and then Orange,OST Red and Sandstone, the colours will blend together and create this fallen leaves look.


Once the card has dried you can begin adding stamps to the background. I used a stamp that created an outline instead of a silhouette so that the background colours would show through.


I used a banner die to cut out three lots of flags using Autumn toned pattered papers. I layered them together and then glued them in place. I used a sentiment die cut to finish off the card.


Thank you for visiting.


Thursday, 7 September 2017

How To Create A Sweet And Easy Tag With Penguins And Presents

Hi all

I have a little tag to share using the new Penguins and Presents stamps by Sticker Kitten.


Start off by painting half of the tag with blue acrylic paint. Then stamp the snowy hills stamp at the bottom and apply glue. Sprinkle with fine white glitter and leave to dry.


Use a dry baby wipe and paint it with green acrylic paint.  Stamp over the top with the trees stamp, cut them out and glue to tag.

Stamp out a penguin, hat and scarf.
Colour them in and cut them out 
assemble the pieces and then add those to the tag.


Finish off by stamp out the sentiment onto the tag and then stamp over the top of the tag with the snowball texture stamp using gold ink.


Thank you for visiting


Wednesday, 6 September 2017

How To Create An Altered Box With Best Glue Ever

Hi all

I have a altered box to share today using Best Glue Ever from ScraPerfect available here http://scraperfect.com/


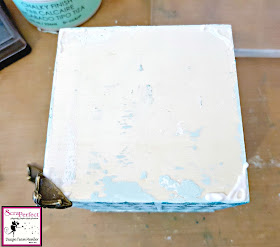
Start off by painting a small wooden box with gesso and then paint over with chalky finish paint.


Stamp over the whole box with a texture stamp using dark green ink and leave to dry before applying modeling paste over the top with a stencil.


Use Best Cleaner Ever to clean the ink off you stamps and tools. 


Apply blobs of Best Glue Ever to the bottom corners of the box and then carefully attach the feet. Leave the glue to set. This glue is perfect for adding metal to wood because it dries fast and has a strong hold once dry unlike PVA glue which is a lot more runny so the bits tend to slid off while it tis drying.


I used clay with silicone molds to create the shapes which i painted with Quinaodone Gold fluid acrylic and then dry brushed with gold paint. Once dry i glued the heart to the wings and adhered it to  the box. I added mdf cogs around the front.


I rubbed a bit of bronze metallic paint over the box to highlight the wood grain a little.


Thank you for visiting