Followers

Tuesday, 26 February 2019

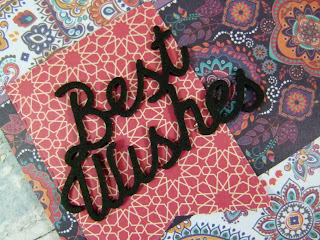
Craft Consortium The Essential Craft Papers Eastern Influences Best Wishes Card

Hello all

I have been playing with these exotic patterned papers for Craft Consortium. These are from the Eastern Influences Paper Pad


  1. Cover a 5 x 7 card with patterned paper
  2. Cut a wide strip of paper and glue across card
  3. Cut out a fishtail flag in red paper and stick to corner of card
  4. Use a word die to cut out the sentiment using craft foam


Thank you for visiting


Saturday, 23 February 2019

Craft Consortium Riverbank Collection Kingfisher Card

Hi all

I am sharing my first project using the new Riverbank collection by Craft Consortium.


Product list


Cover card with patterned paper and then cut out a large rectangle from a lighter colour and a smaller one to fit inside from plain purple.
Apply a stencil mask over the base of the card using modeling paste and leave to dry.
Adhere the large rectangle into the center of the card.
Add washi tape across the center and then take the purple rectangle and use background stamps to build up textured layers, glue this down.
Glue leaf shaped trim along the edge of the purple rectangle and then add white sisal to the edge of the card.
 Then paint a wooden flower and glue that on before adding a hat pin to the embellishment cluster.
Stamp out the kingfisher and dragonfly stamps onto card, colour with markers and cut them out.
Adhere the stamped images to the card and decorate with enamel dots. 


Thank you for visiting


Friday, 22 February 2019

The Blank Page Flutter Of Butterflies Art Canvas

Hello all
Learn how to create this art canvas using stamps by The Blank Page Muse.


Various inks


Start off by stamping a few textures around the edges of the canvas.
Next apply a stencil mask to the centre.


Spray with the bronze acrylic ink and allow first layer to fully dry.
Flick on yellow ink and allow to drip down the canvas, dry with heat tool.
Next drip on dark red ink and drip it down the canvas, allow it to mix a little with the yellow before drying it off.


Stamp over the Chain Link Background Stamp using red Archival Ink.


Stamp the butterflies of all sizes onto the vintage news print paper and cut out.
Adhere to canvas from large to small using 3D foam pads.
Finish off by stamping out a sentiment onto card and adding to canvas.

The Blank Page Muse Shop http://blankpagemuse.com/
That's Crafty  UK And Worldwide here http://www.thatscrafty.co.uk/blank-page-muse.html

Thursday, 21 February 2019

Craft Consortium Butterfly Sewing Hoop Decor

Hi all

I have a wall hanging to share using Craft Consortium papers.


Product list
The Blank Page Muse Dandelion Wishes stamp set
Pink Pearl Glue 


  1. Paint sewing hoop white
  2. Once dry glue patterned paper to the back
  3. Paint a mdf honeycomb texture and glue to center of hoop.
  4. Paint up the letters and add those.
  5. Stamp out a few bees, cut them out and add to the center of the hoop.
  6. Stamp butterflies of different sizes onto the newsprint paper and cut out.
  7. Glue them around the edge of the hoop and add pink pearl glue to the centers.


Thank you for visiting

Sunday, 17 February 2019

The Blank Page Muse Correspondence Mixed Media Journal Page


Hello all

A New Year is a time for renewed creativity and today i have a art journal page to share. There is a tutorial too if you would like to have a go.


Products used
Red mist spray
yellow mist spray
Burgundy Ink
Dark Red Ink
Stencil
Modeling Paste
gesso 
Card 


Use red ink on a blank page and once dry, add yellow.
Use Corrugated Stripe Patterned Background Boarder stamp along the edge of the page.


Apply a stencil to the page and pain over with gesso.
Then add another layer of stamps.


Stamp around the corners using the Scratched  brick wall stamp.


Stamp out the ink pot and pen tips stamps onto card and cut them out.
Line up the pen tips on the page in size order.


Add a sentiment and few more stamps to the middle of the page to finish.


Thank you for visiting 


Saturday, 16 February 2019

Prickly Plants Planner Clips and Hunkydory Spectrum Noir ColourTint Review

Hello all

I was asked by Hunkydory to review some of their products, so today i will be reviewing the new Spectrum Noir ColourTint Pencils.


The pencils are so easy to use and they blend really smoothly


I used the Prickly Plants Stamp set and wanted to create some fun bookmarks with them.
I started off by stamping out the images onto card using Archival Ink. The images stamp out crisp and with no smudging.

I then use the ColourTint pencils to colour them in before cutting out the pieces. Next i used double sided tape to mount them onto thick card and cut them out. Finish off by adding a large blob of glue to the back and press the larger paper clips into the glue, leave them to dry overnight before using them.


The pencils can be used as they are or used as watercolour pencils by adding water. I used a water pen to colour the stamps and get a more vibrant colour. 


Thank you for visiting.

Hellgnomes's Death Digis A Menagerie of Sweary Animals ATCS

Hi all

I have a set of ATCS using the new stamps by Hellgnome's Death Digis. Parental supervision for anyone under 40 is advised as F bombs will be present!!


Here they are an menagerie of sweary animals!!


If you haven't hit delete on your internet browser and run for the hills then you can get these digis right here.  


Thank you for visiting

Friday, 15 February 2019

Bleeding Art Challenge Show Us The Love

Hello all

i am back with my entry for the February challenge over at The Bleeding art challenge.


The cube was covered in tissue paper and then a stencil was used over the top. The whole thing was then painted using DecoArt Fluid Acrylic in Magenta.

The Hearts were stamped onto card and then stamped over with a texture stamp before being coloured in with water paints.


I like to use small alphabet beads to add words to mixed media projects.
I added Art balls around the top and painted up a small wooden house which i stamped on.
I then stamped out the large hearts doing two of each so i could sandwich the copper wire into the center. 
You need plenty of strong glue to hold the hearts up.
I then sprinkled on loads of pearls.


I used products from these brands
StencilGirl(R)
The Blank Page Muse
Artful Days
DecoArt

Thank you for visiting

Thursday, 14 February 2019

Valentine's Day Blog Hop 2019

Hi all

I am taking part in the Valentine's Day Blog Hop and here are my ATCS. Some of the blogs are offering a prize but i can offer you all a 15% discount  off your order with The Blank page Muse with code BPMDtKatie2019. So if you would like to bag a set of the Hearty Doodles Stamp set pop over and use your code.


Follow and comment on all the blogs listed to complete the hop!!


Thank you for visiting

Gecko Gals Love You Mixed Media Card

Hi all

Happy Valentines Day!!
I made a card up using one of the stamps from the Heart and Soul Digital Stamp Set 


  1. Ink card with Lindsey's Magicals 
  2. Stamp on a few texture stamps
  3. Mix pink mica powder into modeling paste and apply to stencil.
  4. Add cork,sprinkles and glass glitter.
  5. Stamp sentiment into center of heart.


Thank you for visiting

Wednesday, 13 February 2019

Artful Days Mixed Media Heart Canvas

Hello all

I have a new mixed media canvas to share with you today. It's coming upto Valentine's Day so it will be hearts all the way until the 14th.  So here is my project for Artful Days.


  1. Paint the heart with gesso
  2. Apply Crackle Paste with a spatula and leave to set.
  3. Add the md shapes and paint them with Texture Sand Paste
  4. Glue on pebbles, art sand and art balls. (I used white aquarium gravel)
  5. Glue on a large heart, add a word to the centre and then glue on a resun cupid.
  6. Spritz with Red ink.
  7. Paint everything in Polished Coral Metallic Luster Wax.
  8. Dry drush light pink acrylic paint over the textured areas


Product List