Followers

Saturday 31 October 2015

Docrafts PDT Blog Hop: Monster Mail

Hi all 

I am back with my first atempt at envelope art as part of the Docraft PDT blog hop. I used the Owl stamp and coloured it in with Artiste pens. Here is the hop list


I used Pumpkin and French Lavender Inks in a bottle on the background and then stamped a sentiment.


Thank you for visiting

Friday 30 October 2015

Oak House Studio: Mixed Media Wall Hanging Using stamps featured on Hochanda


Hi all

I am back with an altered wall hanging using the Double Daisy stamp set from Oak House Studio.  You might catch a glimpse of my project on Hochanda today.

the show times are
11 am Roses Bundle
2pm Double Daisies Bundle
6 pm Best Bits


I started off by painting the wooden heart with white DecoArt crackle paste. I then spritzed it with Brazil Nut Pure Colour Chemistry ink.


Using the Triple Chocolate ink pad I stamped the double daisy directly onto the wood and coloured it in with Sunshine In A Bottle Pure Colour Chemistry ink so I ended up with as wood stained effect.


I used the Daisies and Rainbow stamp set to create the sentiment. I stamped it onto the stamp card and spritzed it with ink before tearing the words out.


I used the Mini Roses texture stamp to decorate the edges and fill in the gaps. I coloured a few paper roses with Pumpkin and Brazil But inks to match the theme.


I stamped the large Daisy stamp onto to Oak House Studio stamping card and used the Sunshine in a bottle to colour it before cutting it out and sticking it down. I then placed the sentiment over it and glued every thing down and added embellishments.

Thank you for visiting and all products can be found in the Oak House Studio online shop.


Docrafts PDT Folk Christmas layout

Hi all

I am back with a layout made using the bright Folk Flora Christmas range and a few other bits from the Docrafts September releases. You can see more of my makes in my Docrafts gallery https://www.docrafts.com/Members/KatieLamb/Projects


I have keep this simple with a few layers that i started off by cutting a sheet of 12x12 paper in half and then punching across both edges with the Starbright Boarder punch from Xcut. The Photo is matted onto 2 layers of paper which i trimmed to fit and stuck down with 3d foam pads.


One of the sheets had baubles on it so i cut them out and stuck them down one side of the page.


I used the die cut tags to create layers and adding them amongst strips of paper i had cut out. The frame is made of felt and is from the Gorjuss Girl Tweed range, I just cut in half and placed it behind the layers.


Thank you for visiting

Thursday 29 October 2015

Trimcraft First Edition Mulberry Kisses card inspiration


Hi all

i have a few cards to share using the new First Edition Mulberry Kisses pads.


I used different strips of patterned paper to create the layers and then used a large blossom to create a topper. I then used different die cuts and layered them together.

For this card i used a few heart shaped doilied and used a wooden frame as the focus.

Thanks for Looking


Tuesday 27 October 2015

That Craft Place Button box Fairies new Halloween releases


Hi all 

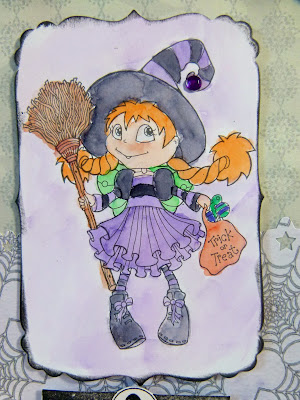
I am back with a Halloween card using other new button Box Fairies digi stamps by That Craft Place. They aired avalible on the Etsy shop right now 


I coloured the image in using the Artiste Watercolour pens which give a nice soft effect when dry. The digi papers are also avalible on the Etsy website.

                                                       
                                                 Here is a close up of the image


Thank you for visiting

You can find the new digi stamps here www.etsy.com/uk/shop/ThatCraftPlaceLtd

Monday 26 October 2015

Oak House Studio: ATCs Using The Double Daisy Set

Hi all 
I am back sharing a few ATCs i made using the Double Daisy stamp set from Oak House Studio. You can find this stamp set here 


I spritzed the blank cards with pumpkin Ink In A Bottle and Brazil Nut Pure Colour Chemistry. Once dry i used the circle grid stamp a stamp which was designed for use ATCs. I used chocolate brown ink and i stamped onto scrap paper before stamping onto the card blank. This will give you a faded background. I coloured the large daisy stamp with Sunshine in a bottle pure colour chem and cut it out.


I cut the daisy in half and divided it between the two ATCs. I had an extra Sunshine and textures stamp so i cut one up so it would fit on an ATC. I used the mini roses texture stamp for the second ATC.


I found that the two ATCs fit together this was completely random.

Sunday 25 October 2015

Trimcraft Christmas 2015: Glad Tidings Card Ideas


Hi all
Today i am sharing a few cards i made with the Glad Tidings collection. Its very retro Christmas and comes with lots of bits like wooden frames and twine.


This is one of the new dies sets released with the Christmas Basics Collection and they cut really well. you can cut the bits out separately so you can mix and match the designs.


Here is another design idea but i used more paper flowers this time and made one of the wooden frame the focus of the card.


Thank you for visiting and you can find more projects on the website http://www.trimcraft.co.uk/ 

That Craft Place October Challenge : Haunted House

                                                            Hi All

Autumn is here and as the air grows cold and days grow shorter, its time to think about halloween, rich orange and red tones and good old fashioned hammer house horror movies. To get you in the mood i have a large MDF freestanding haunted house to show you complete with little ghouls.


I got this effect by layering black acrylic paint on the house,yard and base before coating with a crackle medium. on the house and yard i painted with pale grey then one coat of crackle medium and then black paint to get that decrepit effect.


For the yard i mixed dark green paint with brown and them painted it over the black.The roof is one coat of lilac,crackle medium and then purple.


Thursday 22 October 2015

Creepy Altered Doll for Halloween


                Its Autumn and that means more spooky Halloween makes to share.

Today i am back with an altered porcelain doll which i wanted to look all waspy and ghost like. I hope i don't give you all nightmares.


The clothes are made from strips of muslin which i wrapped around the body until i got the effect i wanted and then glued them into place.


For the skin i mixed Grey DecoArt patio paint with Artiste Sea Spray Acrylic paint and did three coats over the body


For the face i painted the eyes black and used the First Edition Markers to draw on the face


Dont have nightmares and thank you for visiting


Wednesday 21 October 2015

Oak House Studio: Mixed Media Canvas Using the Stamps from The Hochanda show

                                                              Hi all

I am back with a mixed media canvas i made using the new stamp sets available on Hochanda. The bundles come with four stamp sets and a selection of inks. If you would like to learn how to make this canvas then i have a tutorial here

The show is on 21st  October

11 am is showing the Roses Bundle
2 pm and will showcase the Double Daisy bundle
6pm is showing the Best Bits which is a mixture of products


The paper pad i used was the First Edition Falling Leaves and its Autumnal colours worked perfect with the Oak House Studio Brazil Nut and Pumpkin inks. You can find the new Pure Colour Chemistry inks here http://www.oakhousestudio.com/ourshop/prod_3124131-Pure-Colour-Chemistry-inks.html


I love the new texture stamps that come with the Daisies and Rainbow stamp set that will be shown on Honchanda this month.


                                  Thank you for visiting and check out my tutorial

Oak House Studio: Mixed Media Canvas Tutorial

Hi all

I'm back with my first official post as a Design Team Member and i am really excited to be here as i love the Oak House Studio products to bits. Would you like to learn how to make a mixed media canvas? Well i will show you xx


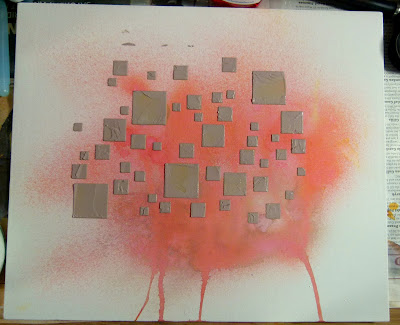
First spray the canvas with Pumpkin Ink In A Bottle and allow some of the ink to run down the canvas.

Oak House Studio Inks In A Bottle Pumpkin and Pure Colour Chemistry Brazil Nut

Mix Brazil Nut Pure Colour Chemistry with some texture paste. Use a stencil to spread the paste onto the canvas.


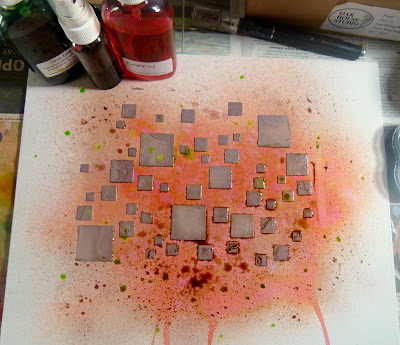
Add a few drops of Brazil Nut Pure Colour Chemistry to an empty spritzing bottle and add a bit of water to make a spray. spritz this over the canvas to tone down the Pumpkin ink. Then flick Citrus Green Ink In A Bottle over the page.

Inks In A Bottle Citrus Green, Brazil Nut Pure Chemistry

Next Using the Square Grid Stamp apply Triple Browns ink to it and stamp around the canvas randomly. Next using the Sunshine Sentiment and Textures set, stamp around the canvas using Golden Oak ink. I then took one of the stamps from the New Daisies and  Rainbows stamp set and stamped that at four points on to the canvas.  The new Daisies and  Rainbows stamp set will be premiering on Honchanda as part of an exclusive bundle.


Daisies and Rainbow Stamp Set

Now its time to get the paper layers built up. I matted the photo onto patterned paper first but did not stick it down as i wanted to place all the paper pieces in the right spot first.


I used a selection of die cuts and trimmed strips of patterned paper to make the layers. I placed them so that i wouldn't cover over the stamp work as i wanted that to be part of the texture.


Its time to add the embellishments. If you do not have any to match the colour scheme then alter them with ink !!. I used cream paper roses and spritzed them with Citrus Green Ink In A Bottle and then Brazil Nut to get an Autumn green. I would recommend covering the entire workspace with newspaper including the wall.


I used the quotes as the title by stamping them onto the board using black ink. If they do not stand out very well then stamp onto Stamping Card and spritz with ink. I tore around the edges so it blended in better. This stamp is also from the New Daisies and Rainbows Set.


Thank you for visiting 


Monday 19 October 2015

Susan K Weckesser Creative team Tumbleweed houses ATCs


Hi all

I am back with some ATCs i made using the tumbleweed houses stamp set.


ATC is short for artist trading card and we swap them with each other.  It's like a miniature work of art


                       I coloured in the houses with First Edition Markers and cut them out.


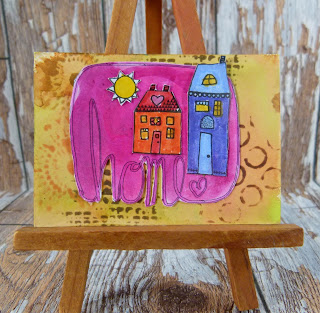
I created the backgrounds by spritzing a couple of Oak House Studio Inks In A Bottle onto the blank card and blending them with a brush.


I created a pattern on the card by rubbing ink over a TCW stencil using a make-up sponge.


The Home stamp was coloured using water based ink for a more vibrant effect.


I used blue inks to create a sky line and coloured in a few of the little houses before cutting them out and lining them up in a row.


Thank you for Visiting


Sunday 18 October 2015

Docrafts PDT Button Jewellery with Pocket Full Of Posies

Hi all

I am sharing my PDT project for this month and i've tried a bit of jewellery making using the charm pack from the Pocket Full Of Posies collection.

Here is a cute button and charm bracelet i made. I used a length of chain and measured it around my wrist to get the sizing correct. I used 20mm and 35mm eye pins to thread the buttons and charms on with. I grabbed the end of the pin with my pliers and wrapped it around the top.


To make the frame charms i drew around the frames onto a sheet of patterned paper and then cut them to fit before flooding the charm with Anita's Glossy Accents an idea i borrowed off Becky.

The necklace is simple to make.
Take a length of chain and once you have the correct length open up the links and add a  lobster clasp and jump ring so it can be opened if needed. The pendant was made using a larger round metal frame from the charm pack. I took a small white posy from the Papernania mulberry flowers pack and spritzed it with Cardinal red and gold spritzing inks. Once dry i adhered it to the frame with a blob of glossy accents and then flooded it with more glossy accents and placed a gem in the middle before it dried.


Earrings
Quick and easy all i did was thread 35mm eye pins through some small buttons and added jump rings so i could attach more buttons and earring hooks.


Thank you for visiting and here are the product codes 
PMA 354304 Red button pack
PMA 158460 Pearl buttons
PMA 158400 Heart charms
PMA 356907 Pocket Full Of Posies Charm Pack
ANT 763100 Anita's Glossy Accents