Followers

Showing posts with label altered art. Show all posts

Saturday, 14 September 2019

Bleeding Art Challenge Radley The Nuclear Apocalyptic Bear

Hello all
I am back with my latest victim, A bear i found at a charity shop which has become a cross between the Hulk and something off  Mad Max. I've named him Radley because he maybe radioactive but don't worry he doesn't bite.


Products used
Leaf Green Brusho Powder
DecoArt Black Gesso
Burlap or any garden sack
Metal Charms
Face mould and clay
Bronze split pins
A teddy bear 


Start off by soaking the bear in Leaf Green Brusho Powder. I would wear gloves for this as you will stain your hands and everything else in green ink. Drain the water out of the bear and then mix the fluid acrylics with water and slosh it on. i used a lighter colour on the paws and muzzle.
Dry out the bear completely by hanging it outside for the neighbours to see, It will keep the curtain twitchers entertained while you prepare the clothes.


Just chop off a strip of burlap and wrap it around the bear, use the split pins to hold it on so you don't have to sew anything.
Take some burlap ribbon of any trim in a dull brown tone, and wrap it around the shoulders and bottom of the bear. Again hold the straps together with split pins.
To make the body armour take two large metal charms and coat with Black Gesso. When this has dried just rub on the metallic lustre.
 Paint up a small face and glue it on. 
Thread twine through the charms and tie them on or use glue, lots of glue!!
Finish off by adding random metal charms to the bear.

Thank you for visiting


Thursday, 1 August 2019

Emerald Creek Crafts Steampunk Altered Box

Hello all
I am showing off these lush embossing powders off with this altered box for Emerald Creek Crafts


Product used
DecoArt Texture Sand Paste
DecoArt Heavy Gel Medium
DecoArt Premium Acrylic Quinacridone Gold
Wooden box


The cogs are die cut from card and then i covered them in heavy gel medium before sprinkling on chunky rust embossing powder. 


I used Pertina on the clock and added some to the large rusty cog. i added more heavy gel medium to the parts that i wanted to add another colour to.


The box was painted and then i used decoupage paper over the top and sides. Then i painted over it with Quinacridone Gold acrylic paint. Then i glued the pieces onto the box.


I added texture sand paste to the edges of the box and then painted over it with Quinacridone Gold paint to add more rust.


Thank you for visiting

Saturday, 23 March 2019

The Blank Page Muse Fairy Altered Peg

Hello all
Spring is beginning so i have a Spring themed altered peg to share using stamps from The Blank Page Muse. 


Products used
Docrafts Giant Peg
Resin Flowers
Lemon Brusho Powder
Green Faux Moss


Paint the peg in gesso.
Once dry, stamp over with the brick wall texture in red ink.


Mix yellow Brusho powder with a small amount of water. 
Paint it over the peg.


Stamp out a fairy and a flower onto card.
Colour in with marker pens. 
If you do not have a colour chart, write the colour number onto paper with the corresponding colour so you can see how the colours work together.


Cut out the images.
The flowers are taller so glue a hat pin onto the back to hold it up.


Glue green faux moss onto the top and then use blobs of glue to hold the images in place.
Add tiny flowers and butterflies to finish


The Blank Page Muse Shop http://blankpagemuse.com/
That's Crafty  UK And Worldwide here http://www.thatscrafty.co.uk/blank-page-muse.html
FB Fan Page https://www.facebook.com/groups/bla...

Friday, 1 March 2019

Gecko Galz March Customer Challenge Bless This Nest

Hi all

I am back with my make for the March customer challenge, this year is going by fast!!

I  used the Lovely Little Birdies Collage sheet which will be released on the 1st March. 


This started off as a paper mache book which i painted with gesso and then blue acrylic paint. 
I then used a crackle medium on the cover which sort of worked. I then glued one of the toppers to the center.


I painted the inside of the book and glued in a topper on the inside cover.
I then glued in some cheese cloth and sprayed it with blue ink.
I added a little birds nest with eggs and a chick to finish.


Thank you for visiting 

Friday, 14 December 2018

Gecko Galz Christmas Tree Decorations

Hello all

Welcome to the Gecko Galz  25 Days of Christmas Decorations event. This year each team member will be providing you with 25 days full of festive inspiration.


This is an altered tart tin that i painted up and added lots of bits too. 


Blog http://geckogalzscrapbooking.blogspot.com/

Etsy  https://www.etsy.com/uk/shop/geckogalz

Group https://www.facebook.com/groups/654948344560159/

Thursday, 29 November 2018

The Blank Page Muse November Day of the dead skull

Hi all

Today you will learn how to turn a plastic Halloween skull into this sugar skull using The Blank Page Muse Stamps


You will need
Plastic skull
gesso
acrylic paint in assorted colours
Permanent ink pad
tissue paper
larger resin flowers.


Cover the skull i two coats of gesso and then white paint.


Next stamp out the flowers on to tissue paper and then paint then with acrylic paint. Do this on a non stick surface as the paint with go through the tissue a little.


Once flowers have dried, cut them out and adhere to skull using heavy gel medium. Add resin flowers for the eyes.

The Blank Page Muse Shop http://blankpagemuse.com/
That's Crafty  UK And Worldwide here http://www.thatscrafty.co.uk/blank-page-muse.html
FB Fan Page https://www.facebook.com/groups/bla...


Wednesday, 28 November 2018

StencilGirl What's Old Is New Altered Ukulele

Hello all

I have a altered Ukulele with a process video to share with you today. I picked up the battered thing for 50p from a local charity shop.

Brusho Powders Violet, Purple and Prussian Blue. 
DecoArt Modelling Paste
SamanthaK MDF pieces
Colourcraft Violet Eco Friendly Ready Mixed paint
Colourcraft Eco Metallic Luster Purple. 


Here is a process video showing how i created the project.


Here are a few close ups


Thank you for visiting


Monday, 29 October 2018

Artful Days Tombstone Wall Hanging

Hello all

This project began as a wooden Halloween wall plaque from Poundland, i stocked up on a few from last year and have been creating my own shop of horrors with them. I look forward to my annual rummage to see what i can find to alter.


I find that black gesso will cover over all the writing and print so that something like a pre-printed wall hanging can be redecorated. If you can't get hold of any black gesso then a few layers of black paint will do the trick.

This video will show you how to get the cracks. You do not need crackle products but can get the same effect by applying a thick layer of PVA glue to the base first, Allow it to go slightly tacky before applying the paint and then leave it to set.


Product list

DecoArt Weathered Wood Medium
DecoArt Crackle Paste
DecoArt Fluid Acrylics Quinacridone Gold
DecoArt Black Gesso
DecoArt Acrylic Spray Yellow Green
DecoArt Modeling Paste


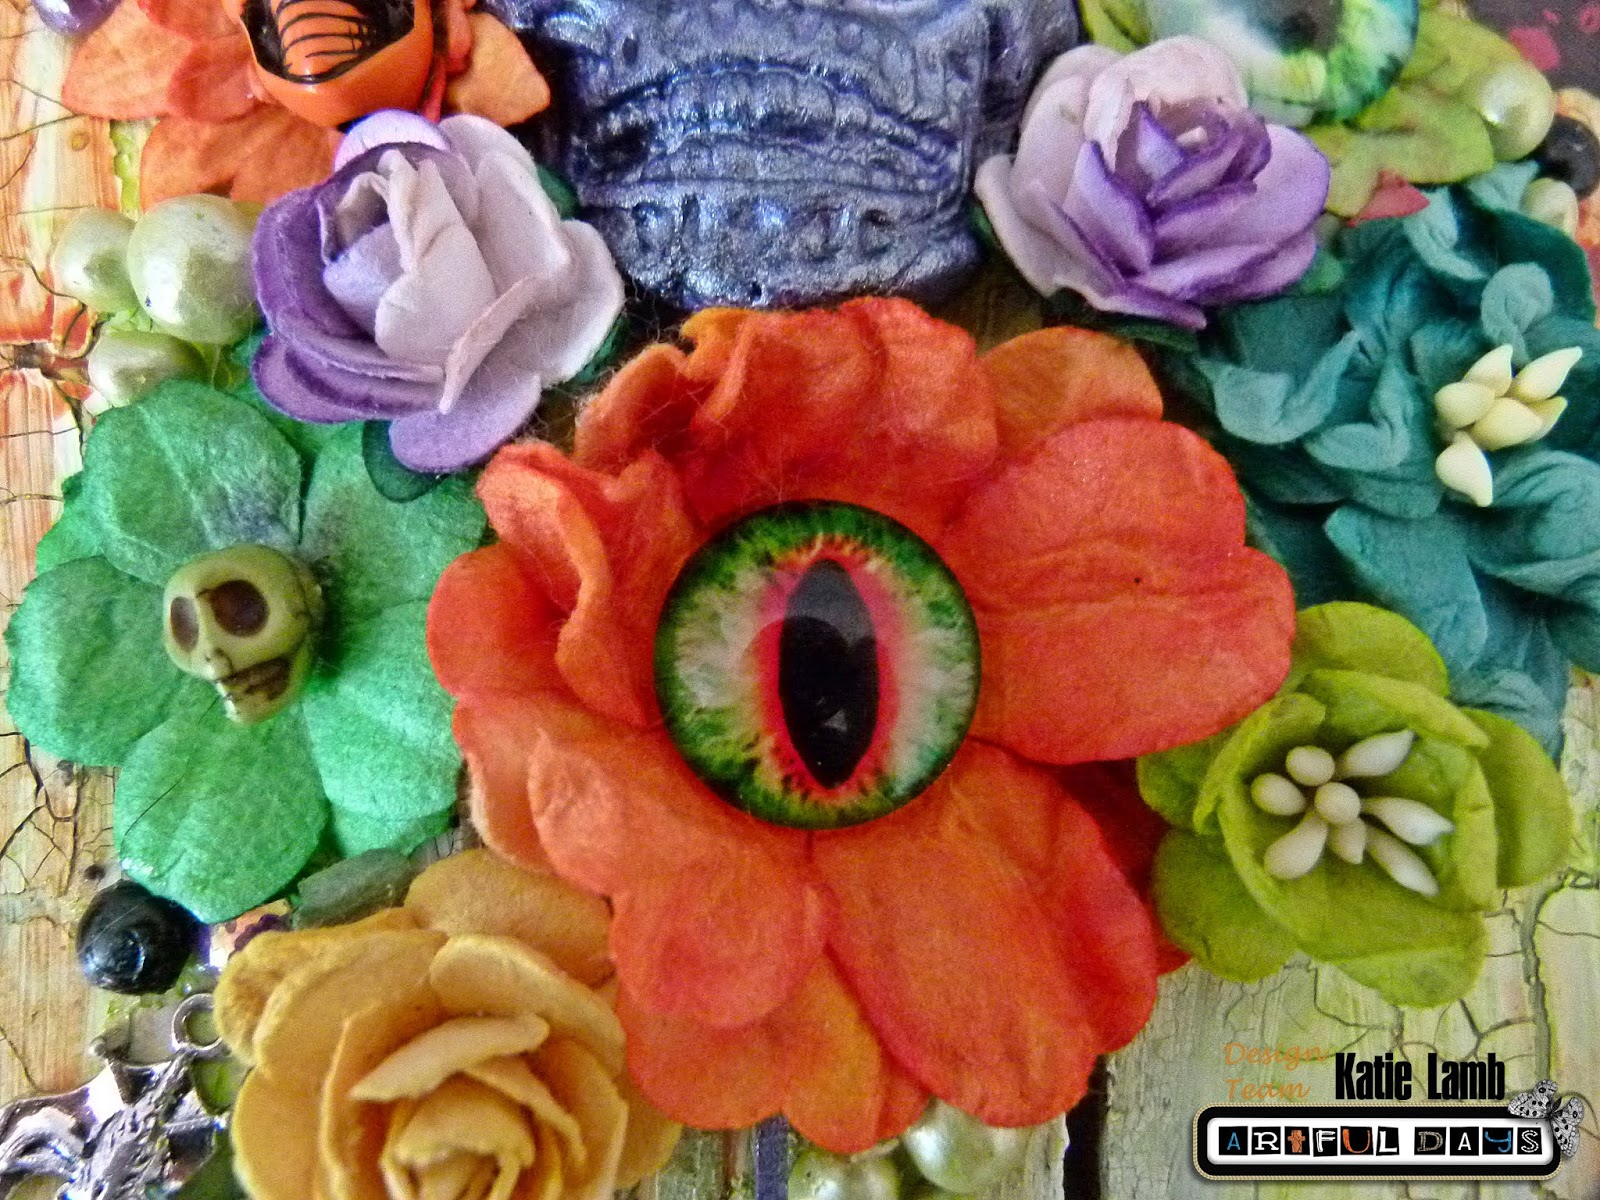
I used ink to spray white paper flowers, these are the flat mulberry type so to get them to look like flowers i layered three flowers together and then crumpled them up while wet. I added glass eye cabochons and skull beads to the middle. The skull in the center is made using a mould and paper clay. It was then painted purple with a layer of metallic paint over the top.


The chipboard spiders have been painted and then decorated with gems,the  Pear Drop Marbled Gems just happen to be the right shape for the spider's body.


I added the pearl balls and charms around the project with a few paper die cuts.


Thank you for visiting and please join us 

Website and Shop http://www.artfuldays.co.uk
Facebook Group Artful Play Days https://www.facebook.com/groups/1897689496969127/

Wednesday, 10 October 2018

Fallout Game Props: Canned Food Pen Holders

Hello all

It is the start of my Fallout game props series.


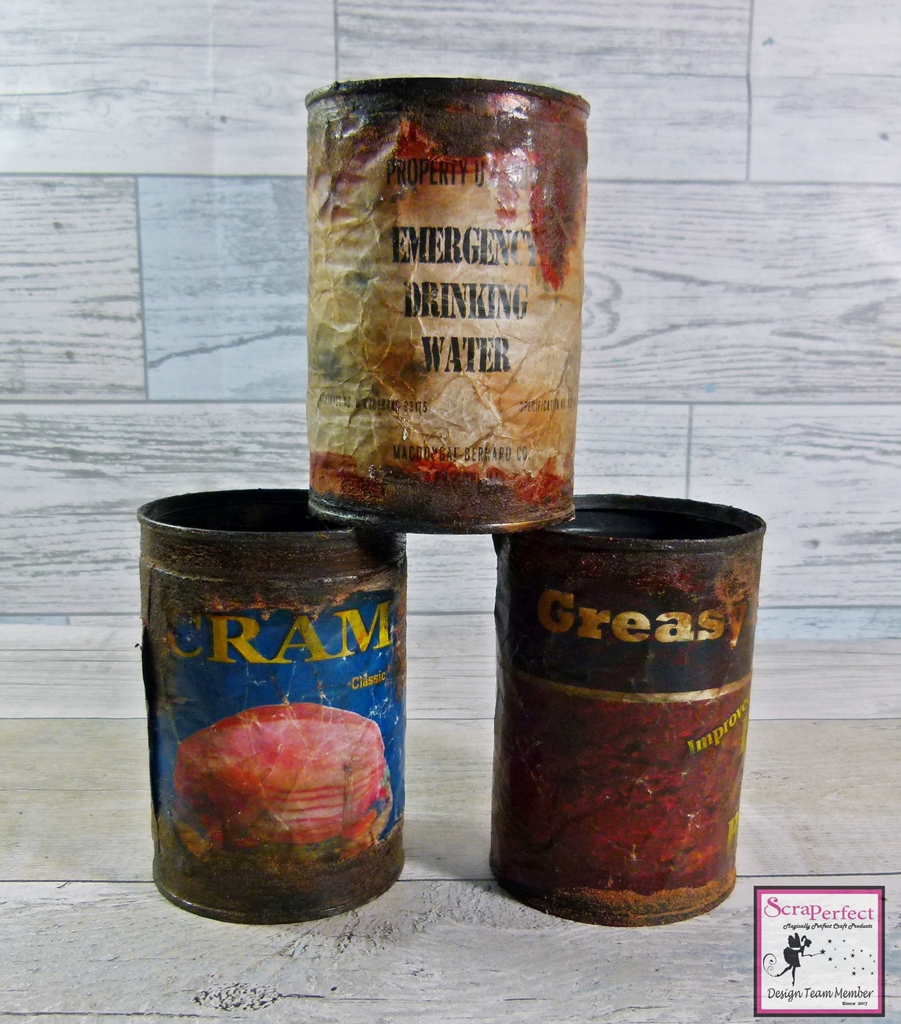
 Learn how to make these Fallout themed pen holders using Best Glue Ever and a lot of rust. If you haven't played this game before it is basically a first person shooter with RPG elements. Based in a post nuclear future yes it all sounds grim but it's a lot of fun to play and it has this cheerful futuristic 1940's theme underlying the story. 


So slap on that pip boy and lets explore the wasteland.


Product list
ScraPerfect's Best Glue Ever™
Print outs links bellow
DecoArt Quinacridone Gold Fluid Acrylic
DecoArt Texture Sand Paste
DecoArt Patio Paint Black and Brown
Tim Holtz Distress Inks Rusty Hinge and Vintage Photo
Black Ink Pad


You will need a few clean cans. Paint the top and bottom with brown and black patio paints and leave to dry.


Next print out the labels. I had to fiddle around with the size to get it to fit but you can print two labels and stick them together. I just cut them out and crumpled them up. Next i used a make up sponge to apply distress ink over the top. I just layered up the Rusty Hinge, Black and Vintage Photo until it looked dirty. I roughed the edges and created small rips in the paper.


Apply the Best Glue Ever over the back of the paper. It takes a bit longer to dry so you  have time to position the label before it sets.


Next  paint the top and bottom with another layer of black paint and then apply the texture sand paste. It doesn't matter if the paint is slightly wet as this adds to the grunge.


Once it has dried, Paint on the Quinacridone gold over the texture paste. You can add a little water to tone down the rust colour.


You should get something like this once all the layers are on. You can just keep adding layers of paint until you are happy with the look.


Thank you for visiting