Followers

Tuesday 31 January 2017

Whisker Graphics Altered Clothes Hanger Using Divine Twine

Picture of finished item

Products used

Divine Twine  Green Apple, Aqua, Coral, Purple Plumb and Lemon

Paint a wooden clothes hanger with white gesso and then with blue paint. Wrap Divine Twine around the middle, using different colors.

Close up of pom pom rows

Thread pom poms and other found items onto different lengths of twine and tie onto the bottom of the clothes hanger.

Close up of altered hanger

Decorate the top of the hanger with resin flowers and a bow

Close up of hanger decoration

Thank you for visiting

Sunday 29 January 2017

The Robin's Nest Tutorial Scrapbook Layout Lights

                                                                                         Hi all

I have a new tutorial showing you how to create this layout using The Robin's Nest products. You can find them here http://www.robinsnest-scrap.com/


Products used

Wedding Cut outs Card Stock


First using a couple of stencils apply White and Black Gesso onto the page at random and let dry. I like to mix them up and add lots of texture.


Add Red  DecoArt  Metallic Lustre around the edges and rub over it to blend. 
Flick ink over the page. The more messy the background the better, mixed media isn't meant to be perfect.


Cut up the card stock into rectangles and strips. Layer the larger rectangles at the bottom and keep adding layers until you are happy with their position and glue to page.


Use a few texture stamps to stamp around the edge of the page. It doesn't need to look neat.


Add more stamping around the page and over the layers


Decorate the page with shells and flowers. Add a title with alpha stickers

Thank you for visiting


Friday 27 January 2017

How to Create Breathtaking Art Journal Pages with Brushos


Hi all

I have a new journal layout i created with the Brusho set i won from the Colourcraft C&A Facebook page


I started off by spritzing water onto the pages and them using a paint brush to lift the ink crystals out of the tub. I then sprinkled it onto the area i wanted to add the colours. I let each colour dry out a little bit before i added the next one.


I then used DecoArt White Gesso and applied it to the centre using a pallet knife and let it set.


I used the Crafters Companion Textures to add the detail

Product list


DecoArt White Gesso

Crafter's Companion Textures Stamps


Thursday 26 January 2017

How To Alter A Heart Shaped Box

Hi all

In this tutorial you are going to learn how to alter a  heart shaped box using mdf shapes and Decoart acrylic paints.


First of all i painted the box pink and then glued white lace around the top.


Apply texture paste using a stencil mask and leave to set.


Paint a frame in gesso and then paint with a dark red paint


Paint over with Weathered Wood Crackle Medium and leave to dry


Paint over again with the light red paint and let dry


Paint over the box lid with Radiant Red Metallic Lustre.


Use a stencil to add texture to the frame and leave to dry


Paint the mdf word and glue to the frame


Glue frame and love birds to box lid


Decorate with flowers

Sunday 22 January 2017

The Robin's Nest Men's Birthday Card Fishing Tutorial


Hi all

Here is a tutorial on how to make this fishing themed card using The Robin's Nest Products. You can find them here http://www.robinsnest-scrap.com/


Here is a list of products i used


Cover a 5 x 7 card blank with Getaway Glitter Card Stock. This is double sided card so you can turn it over and used both sides.

Cut a sheet of blue stripy card stock to 3 x 6 inch and adhere to center of card

Cut up a few matching sheets of paper and layer them together


Once you are happy with the layers glue them down using Best Glue Ever. Add 3D foam tape to the back of the longest strip and adhere over the layers. The 3D tape allows for more layers and bits to be added after.


Using the Fishing Rub Ons add a fishing rod down the side of the Kiwi Sherbet card stock.


Take one of  the Leafy Green Card and place 3D foam on to the back and adhere to card.


Add some of the fish onto white card stock and cut out so you can position them onto the card before sticking them down.


Adhere them to the card along with a few drew drops


For the sentiment i used the Fishing Rub Ons and added the sentiment to the center of the dollies


Thank you for visiting


Sunday 15 January 2017

The Robins Nest Lights Scrapbook Page

Hi all

I have a new mixed media layout to share using products from The Robin's Nest
You can see the full tutorial here http://chatteringrobins.blogspot.co.uk/

Main shot of scrapbook page

Close up of stencil and embellishments

Close up of starfish stamp

close up of stamped boarder

Thank you for visiting


Things to Alter MDF Basket and Ink storage

Hi all

I am sharing my final project for Things to Alter today. It is with great sadness that my time with this team has come to an end but life must go on.

I used the  5 inch by 4 inch long basket which is great for storing paints and ink bottles. You can find it here http://thingstoalter.co.uk/products/mdf-baskets-with-handles


close up of altered basket

close up of painted mdf butterfly

close up of scrabble tile letters


Thank you for visiting

Wednesday 11 January 2017

DecoArt Blogger Program Be Bold Art Journal

Hi all 

I have a new journal page to share using my new DecoArt paints and my word for 2017 is bold.

main image of art journal layout

I have been playing with the stamps i bought in the sales and wanted to add a lot of texture so i stared off by applying the Crafters Acrylic to the Gelli Plate and transferring it on to the blank pages.

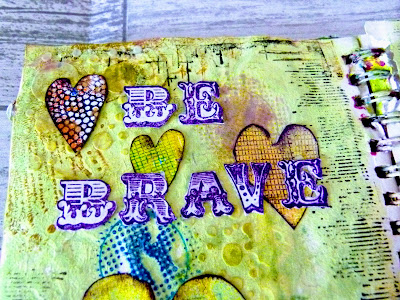
Close up on be brave letters

I then added some texture stamps around the edges and stamped circles in the centre. I used Andy Skinners new stencil  Bubbles to draw an outline around the textured circles. I then added more texture using the Bubbles Stencil with the modeling paste.

close up of journal background and be bold lettering

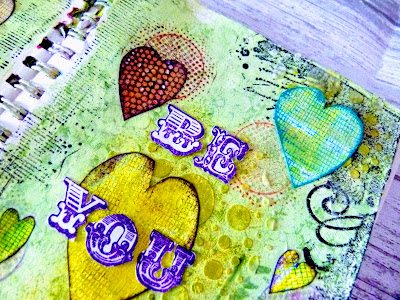
I took some of the prints i created earlier with the Gelli plate and hand drew some hearts. I then used the Oak House Studio Texture Squares to add texture.

close up of Be You letters

The words i created with the Indigo Blue Circus font stamps and i just cut them out and stuck them down

close up of doodled hearts

Thank you for visiting