Followers

Showing posts with label crafts. Show all posts

Wednesday, 25 March 2020

DecoArt Blogger Outreach with Blank Page Muse Stamps

Hello all
It's has been a while since i blogged and to be honest i did plan to focus mainly on Instagram but the last 10 months of my life have been crazy starting with changes to my work hours and location, which are back to normal now but i am struggling to get back into things. Any way i have been mainly art journaling because i have had to give up half my craft room for our online business so i have no room for the chunky projects anymore. I did have a good clear out which has helped but i am still finding stuff lol. 


So here is my latest art journal. I started by stamping the background stamps on first and then adding the DecoArt mist sprays. The Blank Page Muse has all these new stamps which are great for us mixed media people. I will add the links at the bottom for you to take a look.


I hope everyone is ok today? The world is in absolute chaos and the only thing we can do is stay indoors and create.


The Blank Page Muse


Friday, 19 April 2019

Easter Blog Hop Art Egg-stravaganza

Hi all

It is our first Easter blog shop and my project is an assemblage. I was going for an Easter basket look.


The images are from Gecko Galz and come as collage sheets.

Here is the blog roll for you to hop along with.

Life in a Snapshot You are here !!

The tart tins are painted with DecoArt metal primer and then miltisurface paint. I then used a long cotto


Thank you for visiting 

Thursday, 15 November 2018

Bleeding Art Challenge November My Art Bleeds Mixed Media Canvas

Hello all

We are on to the second challenge with Bleeding Art and the theme this month is anything goes so time to get creative. Join us by following the links

https://bleedingartchallenge.blogspot.com/2018/11/november-challenge-anything-goes.html?m=1


Paint the frame black and leave to dry. Next add a thick layer of crackle paste and once set apply a stencil mask to the frame and base.
Stick down the chipboard pieces and other bits. 
Paint on more white gesso and leave to dry


Spray with Canvas Corp Brands Tarnished Silver and then spray with Rusty Red.
Then add heavy gel medium and add micro beads, sand, glass beads until it is nice and crunchy looking.


Paint the mdf hearts with metallic luster and add letters. 
Then add more crunch to it


Some texture close ups.


Thank you for visiting.


Friday, 2 November 2018

Day of the Dead Skeleton Wall Hanging With The Blank Page Muse Stamps.

Hello all

I have a Day of the Dead Skeleton to share with you today. I would just like to say that dressing a skeleton was harder than i thought.


Products used

The Blank :Page Muse Assorted Flowers https://blankpagemuse.com/assorted-flowers-flourishes-mustache-line-art-rubber-stamp-michelle-frae-cummings-sc52-100/

MDF Skeleton by Fernli Designs
White Premium Acrylic DecoArt
Ranger inks
Brads
Red Felt
Red Lace
Ribbon
Resin Flowers
Foam Flowers
Cheese Cloth


Paint the pieces with gesso and then a few layers of white paint.

Stamp the flowers and patterns from the Sugar Skull Stamp Set onto the skeleton using different coloured ink pads. Add resin flowers for the eyes.


Create a vail by cuting a pice of cheese cloth and gluing it to the head, Add a row of foam flowers along the top.


Using red felt create a skirt by cutting a strip of felt and then cutting the ends into a point. Glue on some red lace and ribbon along the hem and top of the skirt. Decorate with resin flowers.

Thursday, 25 October 2018

Craft Consortium Little Fawn Shaker Card


Hello all

I have a shaker card using the new Little Fawn collection  by Craft Consortium.


I filled the shaker box with sequins, seed beads and buttons using Autumn colours.


I added paper flowers and flatback pearls to finish off the card.

Thank you for visiting 

Wednesday, 17 October 2018

Hellgnome's Death Digis The Lost Cosmonaut

Hello all

I am back with a space themed card using Hellgnome's death digis. Did you know that we have a collection of dead bodies floating around in space? yep Dogs, cats., monkeys and maybe a couple of Russian cosmonauts. During the space race of the 60s, scientists sent up a dog named Laika so they could study the effects of space on living things. Poor thing died because they didn't realise that there was no oxygen in space. It seems daft now but back then all this was new. Now there is a conspiracy theory that Russia lost a few astronauts during early test flights and they covered it up to save face.


use watercolour paints and randomly apply colours to the center of a blank card. Keep them matching so you don't get a muddy mess. Once dry, take black acrylic paint and paint the rest of the card, blend a little black into the colours. Take white acrylic paint and mix with a little water. make sure you have covered everything in paper including yourself as this bit gets messy!!. Flick the white paint over the card and keep going until you have added thousands of tiny stars to the card.


 use markers on the spaceman, choose three matching colours and colour the image with the lightest colour first. Then decide which direction the light is shining. Use the second lightest colour on the part where the light meets the shadows. finally use the darkest colours on the bits where the shadows will fall. With practice you will soon get the hang of colouring.


paint a piece of card black and stamp a sentiment on using gold ink. Flick white paint over it and then use a white ball pen to add and outline to the sentiment. it is better to stamp the sentiment onto separate card in case it smudges


Thank you for visiting

Shop https://www.etsy.com/sg-en/shop/InkedArtistAvenue
Website  http://inkedartist.com/hellgnomes-death-digis/
Facebook  https://www.facebook.com/inkypinkyboo/
Facebook Group https://www.facebook.com/groups/446489809207299/
Instagram  https://www.instagram.com/ocu_lar/ 
https://www.instagram.com/inkypinkyboo/


Wednesday, 10 October 2018

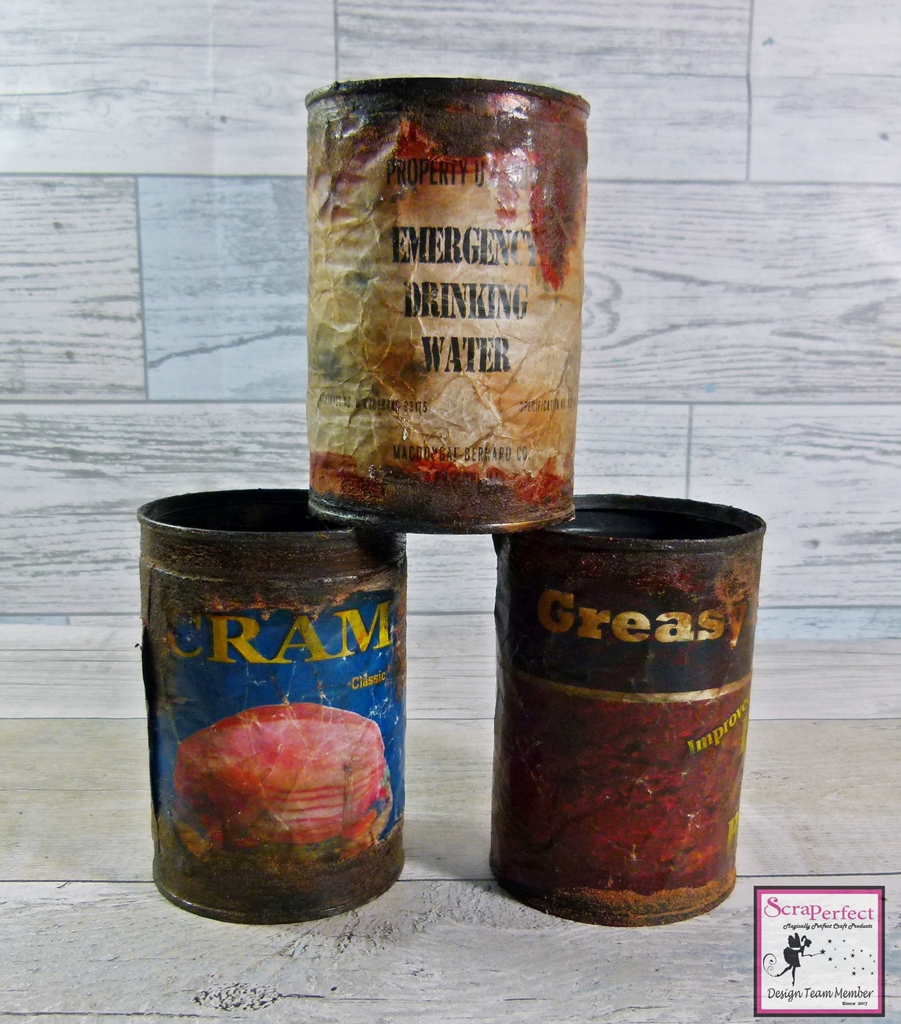
Fallout Game Props: Canned Food Pen Holders

Hello all

It is the start of my Fallout game props series.


 Learn how to make these Fallout themed pen holders using Best Glue Ever and a lot of rust. If you haven't played this game before it is basically a first person shooter with RPG elements. Based in a post nuclear future yes it all sounds grim but it's a lot of fun to play and it has this cheerful futuristic 1940's theme underlying the story. 


So slap on that pip boy and lets explore the wasteland.


Product list
ScraPerfect's Best Glue Ever™
Print outs links bellow
DecoArt Quinacridone Gold Fluid Acrylic
DecoArt Texture Sand Paste
DecoArt Patio Paint Black and Brown
Tim Holtz Distress Inks Rusty Hinge and Vintage Photo
Black Ink Pad


You will need a few clean cans. Paint the top and bottom with brown and black patio paints and leave to dry.


Next print out the labels. I had to fiddle around with the size to get it to fit but you can print two labels and stick them together. I just cut them out and crumpled them up. Next i used a make up sponge to apply distress ink over the top. I just layered up the Rusty Hinge, Black and Vintage Photo until it looked dirty. I roughed the edges and created small rips in the paper.


Apply the Best Glue Ever over the back of the paper. It takes a bit longer to dry so you  have time to position the label before it sets.


Next  paint the top and bottom with another layer of black paint and then apply the texture sand paste. It doesn't matter if the paint is slightly wet as this adds to the grunge.


Once it has dried, Paint on the Quinacridone gold over the texture paste. You can add a little water to tone down the rust colour.


You should get something like this once all the layers are on. You can just keep adding layers of paint until you are happy with the look.


Thank you for visiting

Thursday, 13 September 2018

The Blank Page Muse Summer Surf Mixed Media Tag

Hello all

I have a very summery tag to share using bright colours and the new surfboard stamp by The Blank Page Muse.


Products used


Assorted Ink Pads
Assorted Mist Sprays
Embossing Powder
Modelling Paste 
Card
Gems, pearls and other small embellishments.


Start of by using three mist sprays and spraying on the ink in bands of colour.


Apply a stencil mask using modelling paste and then sprinkle over the top with embossing powder.


Heat the powder until it has set and the modelling paste has dried. Next tack a mixture of texture stamps and stamp them randomly around the tag.


Stamp out the surfboard stamp and flip flops onto card and spray with inks to add colour. Once this has dried cut it out and adhere to tag.


Stamp out the sentiment onto card and ink before cutting out and adding to the tag.


Finish the tag off by adding a variety of embellishments. 


Saturday, 25 August 2018

StencilGirl Grungy Faces Art Journal

Hi all 

I have created a grungy art journal using StenciGirl stencils. I have a process video showing you how i created it.


I have include some close up shots of the art journal pages as well. The texture stamps are by The Blank Page Muse https://blankpagemuse.com/


\

Stamps are from https://blankpagemuse.com/