Followers

Friday 30 June 2017

How To Create Amazing ATCS With Brushos


Hello crafty friends

I have a new tutorial for you.


I started off by covering an ATC blank with gesso and then i added a stencil mask over the top.
Next i sprinkled Red Rose down the middle and painted it along the centre and edges using a water brush.

See video


Next i sprinkles Lemon brusho powder onto the white areas and coloured them in with a water pen and blended the colours a little.


Next i painted some dry wall tape with Aztec Metallic Lustre . 
Once dry i peeled it off and cut it up before adding it to the ATC. I then added another stencil mask over the top and this time i used crackle paste.


i used a cog die cut and cut out the shapes from white cardstock which i painted with gesso first and then i coloured in using Brusho powders.I finished off by adding a stamped image to the centre.


For this ATC i added a stencil mask using modeling paste. Then i added  Ultramarine and Purple Brushos before  blending the colours together. I added the painted wall tape around the edges and applied gesso down the centre with a palette knife before stamping over the centre.


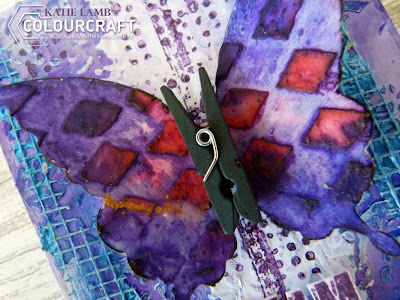
The butterfly i created by die-cutting a shape from card. I painted it with gesso and then applied a stencil over the top using modeling paste. I soaked the butterfly with water and added colour using purple and Rose Red. I love hoe the modeling paste absorbs the colour when it dries.


I added a mini peg to the centre for the body and finished off by stamping out a sentiment.


I added a bit more texture around the edges with a texture stamp.


I painted the base with gesso and then spritzed water into the corners before adding Green Leaf and Lime brusho powders. I then stamped around the base with texture stamps and added a stencil mask.


The word is stamped out in card and coloured with Olive Green Brusho so i blends in with the rest of the project.


The Flowers have been stamped out onto card and coloured in using Lemon, Emerald and Olive Brusho powders. I wanted to create a blended effect so i used my water brush to guide the colours together.


I decorated the flowers with self adhesive gems and dotted a few half pearls around the ATC.

Thank you for visiting and i will be back soon with another technique tutorial.


Sin City Stamps Deep Sea ATCs Tutorial

Hello crafty friends

I have made up a few ATCs using the Nautical Stamp Set by SinCity Stamps.  


Products used
Copper embossing powder
ATC Blanks
Acrylic paint Lagoon, Sea Green, Avocado
Circles stencil
Green misting ink
Marker pens
mini shells


1) Use Gelli plate to bend green and blue acrylic paint together.

2) Using the Journal Stamp Set, Stamp some texture over the ATCs 

3) Use a stencil to apply modeling paste to background and leave to dry.

4)  Use the Nautical Stamp Set and stamp the octopus and shells onto white card and colour in. Use a brush to paint on the ink.

5) Add the images to the ATC and decorate with shells.


1) Use Gelli plate to bend green and blue acrylic paint together.

2) Use drywall tape on the background and use metallic lustre to colour.

3) Use a stencil to apply modeling paste to background and leave to dry before using metallic lustre over the top.

4)  Use the Nautical Stamp Set and stamp the diver's helmet on to white card with pigment ink. Next sprinkle over copper embossing powder and heat to set.

5) Colour in with misting ink by using a paint brush

6) Add net trim to the corner and add the crab.

7) Decorate with small shells


1) Create the background with a Gelli plate.

2) Apply a stencil over the whole ATC using modeling paste and leave to dry.

3) Use metallic lustre over the raised parts of the background and then stamp over the surface using the textures from the journaling set.

4)Stamp out the bottles from the Nautical Stamp Set onto card and colour with marker pens. Adhere these to the ATC and add a sentiment to finish.

Thank you for visiting

For more inspiration please join our fan group https://www.facebook.com/groups/sincitystampsfangroup/

Wednesday 28 June 2017

I'm Not Weird Mixed Media Tag and Tutorial

Hello crafty friends

I have a mixed media tag to share using the stamps and dies by Gummiapan.


Paint a white tag with Turquoise Metallic Lustre and then Green. Blend them together and then apply modeling paste using a mini stencil.Stamp over base with the Worn Honeycomb stamp and then the Collage Numbers stamp.


Use the Integrated Stars Die and keep paint the  stars with metallic lustre.  Glue them down the tag largest to smallest. Die-cut the doodle circle out of card and glue to centre of tag.


Stamp out a sentiment onto card and cut out the words and place them onto the tag.


Thank you for visiting


Colourcraft june preview

Hi all

I have a new layout on the team blog today


Cheers xx

Monday 26 June 2017

How to Alter a Charming Washi Tape Holder

Hello crafty friends

Learn how to use your Sin City Art Stamps to decorate MDF craft storage and add a personal touch to your craft room.

You will need

A MDF storage container ( Fernli Design) 
DecoArt Americana Decor Chalky Finish Paint Romance
Decoart Triple Thick  Gloss Glaze
DecoArt Crackle glaze


1) Cover all the MDF piece with Gesso
2) Paint with red paint


3) Using black pigment ink, Stamp a few butterflies into the corners and then stamp out a dandelion border.


4) On the outer panels, stamp out rows of butterflies,


5) On the bottom inside panel, Stamp out a mixture of dandelions and butterflies.


 6) coat outer panels with a clear varnish
7) Coat inside area with a crackle glaze or clear varnish
8) Glue the pieces together.

Thank you for visiting


Saturday 24 June 2017

How To Create A Stunning Nautical Greeting Card

Hi all

I have another project for you today using products from Cherish the Memory.  Summer is definitely here in the UK and all i want to do is go to the beach oh well i guess i will have to make seaside themed projects for a bit instead.


I used the vintage papers 6 x 6 paper pad on the card blank and then i used the background from the Romantic Summer Card kit to add the next layer. I added texture sand paste and a stencil to give it a nice sandy look.


I dyed cheese cloth with Brusho powder and spritzed with water to spread the ink. I then dried it out and adhered it to the page. I repeated this step with the webbed trim and then added shells and die cuts from the Romantic Summer Card Kit.


I added a large clam for the main topper and continued to layer up the die cut flowers and shells. I then finished by adding pearls and a sentiment.


Thank you for visiting