Followers

Showing posts with label nautical. Show all posts

Saturday, 13 April 2019

The Blank Page Muse Under The Sea ATC Coins

Hello all

Check out my brightly coloured artist trading coins. using the nautical stamps set available at The Blank Page Muse. Get 15% off using code BPMDtKatie2019.


Product list
White card
Any Circle die cut around 2.5 inches
Ranger Archival Inks, Geen, Purples, Hot Pink,Blue, Teal.
Resin starfish
Resin Shells


Apply watercolour to the ATC Coins
Stamp the texture stamps over the top and use embossing powder over the top.
Add little shells and gems to the layers to finish.


Stamp out the Sealife image in bright colours and cut them out.
Layer the pieces together using 3D foam pads to add dimension.


Thank you for visitng


Wednesday, 30 January 2019

Hellgnome's Death Digis Tentacle Card

Hello all
I have this nautical card to share using images from Hellgnome's Death Digis.


Brusho Acrylic Spray Sea Green
MDF Shapes
Artful Days Art Balls Pistachio
Mermaid Beads
The Blank Page Muse Nautical Stamp Set
First Edition Marker Pens
Sisal Grass Green
Assorted resin cabochons
DecoArt Metallic Luster 

  1.  Spray card blank with ink
  2. Stamp on texture stamps
  3. Paint MDF shape with gesso and then blue metallic luster. Glue this to center of card.
  4. Print out and colour image.
  5. Glue onto mdf shape
  6. Glue down the sisal and then add the embellishments.
  7. Add sentiment 


Thank you for visiting

Tuesday, 2 October 2018

Nautical Shrine

Hello all

i am back with this lush nautical shrine using products from Artful Days.


Start off by assembling the mdf pieces, this is because once you add paint the bits don't  always fit together. Once assembled paint woth white gesso and use crackle paste over the large areas. 


Next add paint to the project and then apply a little rust paste.

Glue on some green net and fake moss. I recycled the net from some fruit packaging. Then glue down the embellishments. 


Paint the Scrapcine pieces and then add a layer of crackle glaze. Once set dry brush with dark brown paint to bring out the cracks.


I painted the resin octopus with acrylic paint and then used the Prima Rust Pastes over the top. I repeated this on the shells too.


I decorated the shrine with mini shells, flatback gems and art balls.


Thank you for visiting\

Products used

Scrapiniec Mermaid https://www.artfuldays.co.uk/ourshop/prod_6239949-Mermaid-2505.html
Prima Rust Pastes https://www.artfuldays.co.uk/ourshop/prod_6105121-Prima-Art-Extravagance-Rust-Paste-Set.html
Resin Octopus https://www.artfuldays.co.uk/ourshop/prod_6387295-White-Resin-Octopus-R7033.html
Acrylic Shell Iridescent Cabochons  https://www.artfuldays.co.uk/ourshop/prod_6441261-Acrylic-Shell-Iridescent-Cabochons-CA3024.html
Faux Green Woodland Moss https://www.artfuldays.co.uk/ourshop/prod_6449440-Faux-Green-Woodland-Moss.html
Mini Shells https://www.artfuldays.co.uk/ourshop/prod_6431800-Mini-Seashells-Capsules-E5024.html
Resin Starfish https://www.artfuldays.co.uk/ourshop/prod_6281982-Starfish-Resin-Embellishments-E5003.html

Social Media Links
Website and Shop http://www.artfuldays.co.uk


Saturday, 16 June 2018

Cherish The Memory Inspire Seaside Themed Altered Letters

Hello

I have a new make to share using the Summer Feelings paper pads available at Cherish The Memory.
https://www.etsy.com/uk/listing/614685279/studiolight-summer-feelings-card-making?ref=shop_home_active_20


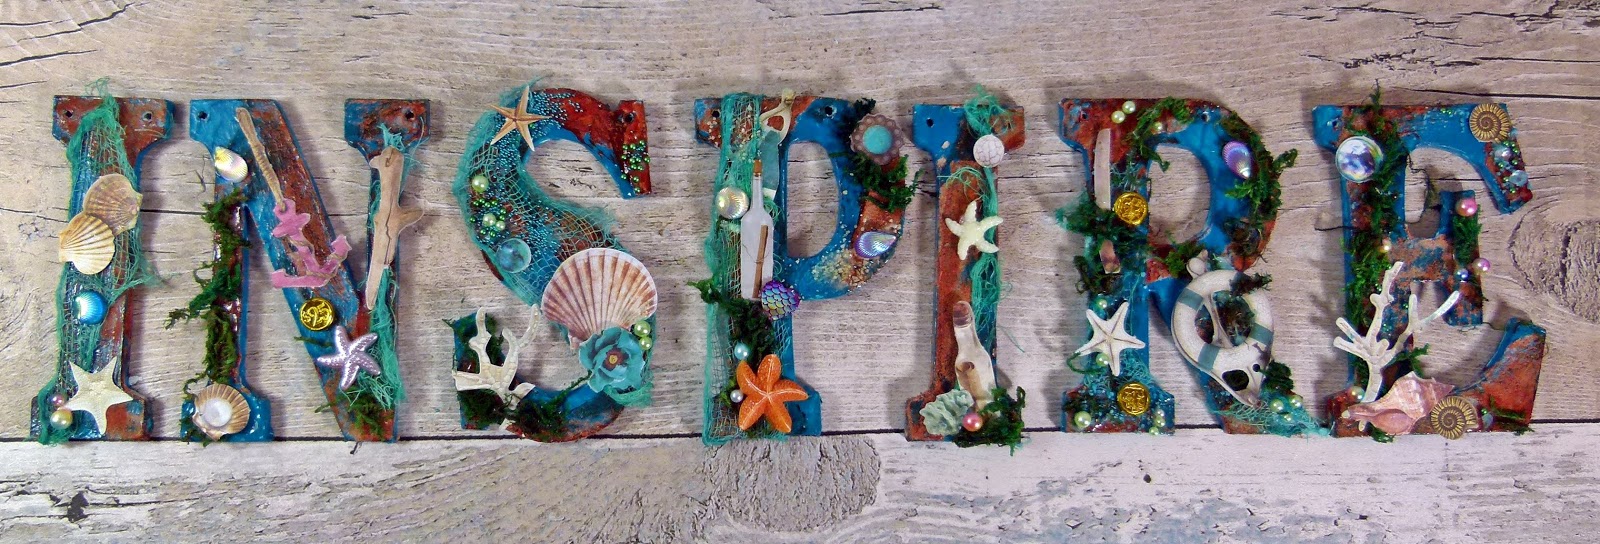
I started off by painting each letter with white paint as an under coat and once that had dries i then painted over the top with DecoArt Premium Acrylic Turquoise. Then i applied DecoArt Texture Sand Paste and let it set.


I painted on Quinacidone Gold Fluid acrylic to get the rust. I wasn't sure to go steampunk on these or not so i met in the middle and went for a water worn look.


Next dye some cheese cloth. 
I used blue and light green to get this colour, This stuff is great as it gets disstressed when you heat dry it so you get this worn net look.


I used heavy gel medium to paste down the cloth and then i started decorationg the letters using the die cuts from the Summer Feeling Die Cut pad.


I also added gems and beads to the letters.


I used fake moss to create this underwater look. I was thinking about the things you find in the rockpools  after the tide has gone in.


Product List
Studio Light Summer Feelings A4 Die-cut Pad
Studio Light Romantic Summer A4 Die-cut Pad
Unbranded MDF Letters
DecoArt Heavy Gel Medium
DecoArt Premium Acrylic Turqoise
DecoArt Fluid Acrylic Quinacidone Gold
DecoArt Texture Sand Paste
Imitation Beads
Fake Moss
Cheese Cloth
Colour Chemistry WaterFall and Bramley Apple (Discontinued)
Resin Starfish, Shell flatbacks and palstic coins.
Micro beads 
Artful Days Glass Sand Yellow and Blue.

Thank you for visiting

Sunday, 10 June 2018

The Blank Page Muse Stamps Beach Themed Mixed Media Canvas

Hi all 

This months project for The Blank Page Muse Stamps is going to the beach. It's one of my favourite themes so i have made a canvas using the Nautical stamp sets. Scroll down to learn how to create this project.

Join the challenge here


Get 15% off if you  order off The Blank Page Muse website. Valid until the end of August with this code
Links at bottom of post.

Summer2018Katie


Product list
A4 Blank Canvas
Rust Paste
Blue Ink
Shells
Heavy gel medium
Mdf frame (Samantha K)
Mdf net shape (Samantha K)
Glass sand (Artful Days)


Tutorial


Cover the canvas with gesso and texture paste. 
Then spray with sea green and blue mist sprays
Apply a stencil to the base using modeling paste.
Dye a few strips of cheese cloth with sea green ink and once dry glue them to the canvas.


paint a frame with rust paste and then dry brush with blue paint.


Cut out a circle from patterned paper using a die and then stamp the octopus in the middle/


Glue the frame to the topper and adhere to canvas. Use a mould to make the mermaid tail, pint it and add a starfish.


Stamp out more sea creatures using different coloured ink pads and cut them out.


Glue the MDF shapes down and then add the sea creatures over the top.


Apply heavy gel medium around the canvas and sprinkle over with glass sand.


Add gems and mini shells around the canvas.


Add chunky layers of glass sand.
 Add pearls and shells to the edges.


The Blank Page Muse Shop http://blankpagemuse.com/


Sunday, 11 March 2018

Plenty of Fish In The Sea Greeting Card


Hi all

I have a shaker card to share using stamps by The Blank Page Muse.


Products

Xcut Circle Nesting Dies
plain card stock
Studio Light 6 x 6 paper
Shells
Foam 
Acetate
inks
SamanthaK  MDF Net
Prima Rust paints
sequins
micro beads.


cover blank card with paper and then cut another strip of  paper and glue it to the centre. 


To create the shaker box, paint a rough circle onto plain card and then stamp the net stamp on one half. place a circle die over the top and cut it out.


Place a small nesting die inside a larger one and cut out two lots of foam and one from patterned paper.


Cut out a base and acetate top using the largest die. Glue the inked circle to the large paper base and stamp on some fish. Glue the foam to the base and then fill with sequins and beads. Glue the acetate top onto the foam and then add a circle frame to hide the glue.


Stamp out a few sea creatures and colour them with ink. Cut them out and set to one side.


Paint a wooden net shape and glue to edge of shaker box and then glue the stamped sea creatures and shells around it.


Finish by adding a sentiment

Thank you for visiting

Monthly Creative Challenge Rules https://blankpagemuse.blogspot.com/...
The Blank Page Muse Shop http://blankpagemuse.com/


Sunday, 23 July 2017

How To Create A Mixed Media Tag With Best Glue Ever


Hi all

I am a guest designer for ScraPerfect this month. ScraPerfect  Manufacture adhesives and other crafting tools, here is a link http://scraperfect.com/


Step one, Apply Brusho powder to blank tag

Take a blank tag and sprinkle Brusho powder onto the  card and use a paint brush with a little water to cover the tag with ink.

Step 2 Take Cheese cloth and dye with ink

Cut a couple of strips from cheese cloth and sprinkle Brusho powder over the top. Apply water to activate dye and leave to dry.

Step 3 glue cheese cloth to tag with Best Glue Ever

Add small blobs of Best Glue Ever onto the tag and adhere the cheese cloth.

step 4 apply texture sand paste

Apply DecoArt Texture Sand Paste to bast of tag and a little over the cheese cloth.

Add beads and shells using Best Glue Ever

Glue seed beads and small shells onto the tag using ScraPerfect Best Glue Ever. Once dry remove any tacky areas using the ScraPerfect Perfect Crafting Pouch.


Fill a mini glass bottle with seed beads and adhere to tag.


Finish tag by adding some seaside themes stamps to the tag .


Thank you for visiting