Followers

Monday, 28 December 2015

Docrafts Project Design Team Bare Basics Steampunk Wall Hanging


                                                                                  Hi all

                         I am back with a new project for the Docrafts Project Design Team.
                 I used the Bare Basics Butterfly Frame to make this steampunk wall hanging.


Take the Steampunk Papier Patch papers and cover the Butterfly Frame using watered down tacky glue as an adhesive. Smooth out the wrinkles in the paper by brushing the layers over with another layer of adhesive. This also seals the layers together.


Print out the Chronology Papers from the downloads section and cut out the bodice. Stick this into the centre of the frame.


Take the wooden scissors from the Bare Basics Haberdashery Icons Wooden Shapes and paint with Artiste Bronze Acrylic Paint. stick this to the centre of the frame and over the bodice.


Die-cut four small cogs out of Kraft Card using the Xcut Cogs Die Set and paint the bronze.
Stick the cogs around the frame and decorate with black pearls.


Finish off by adding a length of gold ribbon for the hanging
Thank you for visiting


I am entering this into the SASPC anything goes challenge which you can join here http://sandee-and-amelie.blogspot.co.at/p/rules-stuff.html

Thursday, 24 December 2015

Fiskarettes Design Team Xmas Day Layout With First Edition Christmas Wishes.

                                                                              Hi all
                 I am back with a few photos of my layout i used in the Fiskarettes tutorial.


Wednesday, 23 December 2015

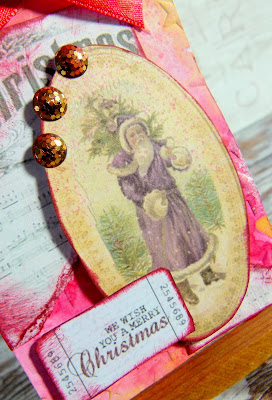
Gecko Galz 24 tags of Christmas

Hi all 

I am playing along with the 24 Tags of Christmas Challenge as an official member of the Gecko Galz Design Team. All the details are here including the latest offers from the Etsy shop http://geckogalzscrapbooking.blogspot.co.uk/2015/12/24-tags-of-christmas.html


I started off with a white tag and i used an embossing folder and then i spritzed the tag with Apple Green ink from Oak House Studio. I then used gold ink and rubbed it over the embossing.


I used the Altered Christmas Digital collage Sheet and cut out the little bits before deciding where to place them. I inked the edged with Colour Chemistry Fire Brick ink and stuck them down.


I used the Old Fashioned Christmas Digital Stamp Set and coloured in Santa's Hat and coat. I then cut out the stamp. I used 3d foam pads to mount it to the tag, i then wrapped jute twine around the topper.


For my next tag i embossed the base and spritzed it with Jubilee Red and Yellow Shimmer misting sprays.

I used both the Altered Christmas collage sheet with the Christmas Icon Collage Sheet. I used a stamp from the Old Fashioned Christmas Digital Stamp Set and tore it up and inked the edged.


I layered up the pieces and used Gold Shimmer Dome Stickers to add a bit of glitter.


I used the bird from the Industrial Digital Set and coloured it in.


For the tag base i used a stencil mask and applied Red Pan Pastels to the base. I then spritzed the tag with Vintage Sepia from Oak House Studio and spritzed a stamp from the old Fashioned Christmas stamp set with Jubilee Red before tearing it up.


I tied two bows one in gold organza and one in jute 


I finished off the tag by adding a few sequins.

Trimcraft Christmas 2015 North Pole card Inspiration

Hi all

How are we all doing? I know Christmas is around the corner so many of you will be busy. I am moving house too so its rather crazy this month. Here is a simple card using the North Pole Collection by Trimcraft.


I used the 3 in 1 tag maker by Fiskars to make the banner and then cut out the letters using the new First Edition Modern Alphabet Set.


Here is another idea using the same punch. This time i added different shaped flags to the bunting.


I used twine to attach the flags to the card


Thank you for visiting

Katie xx

Sunday, 20 December 2015

Trimcraft Christmas 2015 First Edition Christmas Wishes


Hi all 

I am back with a few cards i made using the First Edition Christmas Wishes Collection.


I love the traditional colours and nordic patterns in this collection.


The sentiment was made using the new First Edition Sentiments Tradional set and was cut out of white glitter cardstock.


I used the Fiskars Interchangeable Boarder Punch with the Rainbow carteridge for the trims. The topper was made using the 3 in 1 tag maker.

Goodbye That Craft Place Design Team: Mixed Media Layout Under The Sea

                                                                                     Hi all

I am back with my final  project for That Craft Place i have had a lot of fun playing about with all that MDF and i will still be sharing the odd project on my blog. This is my final project for the team as i have decided to step down and move on. I have enjoyed the challenge and love working with the DT girls who i hope to keep in touch with.


 I used two stencil masks by That Craft Place which are the mini squares and the flourish one which has this nice wave effect to it. Here is the link to the challenge blog if you would like to link up your projects http://thatcraftplaceblog.blogspot.co.uk/


The Texture Stamps are the Splats and stains set and Journal Jottings


                  I then painted the MDF crab from the sea life grab bag and the ships wheel.


i made the topper by taking a Dovecraft Essentials Photo Frame and adhering it over a sheet of paper. I then layered up two different widths of ribbons and layered all the embellishments over the top.


I used the  new First Edition Modern Alphabet dies to make the title and mixed it with the Varsity set.


Thank you for visiting

Katie xx


Friday, 18 December 2015

Paperbabe Stamps Design Team: Introducing the Herringbone Template and Design a Tweed Stamp Set

                                                                        Hi all

I am back with more new releases from Paperbabe Stamps and today i have a new stamp set  and stencil to show you.


Here is the new Design a Tweed Stamp Set which can be used to create an assortment of patterns. I have used mine to create a grungy background.

I used the Art Quote Logic and Creativity stamp  and trimmed it down for the sentiment. I finished the card off with a few sparkles.

Next i am introducing the matching Herringbone stencil 

#


I used texture paste to apply the herringbone pattern to the card and let it dry before die-cutting two hearts out of card. I used the Design A Tweed Stamp Set to add the pattern to them.


I finished the card off with some heart shaped sparkles.

Thank you for Visiting 


Thursday, 17 December 2015

Paperbabe Stamps Design Team December Introducing The Fairy Wings Mixed Media Template


H all 


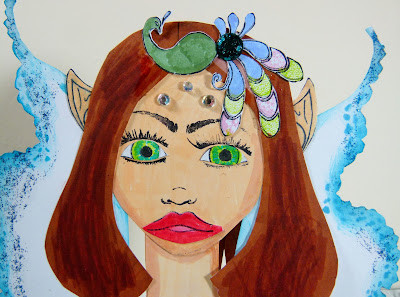
I am back with a new product release for Paperbabe Stamps. This month sees the release of the awesome fairy wings which i have used to make this paper doll.


The wings template will work with both the mini and large doll templates. I drew mine onto white card and then used a blending sponge to blend blue ink over the template to create a lace effect around the edges. Then i finished off with some glitter glue.


The face is made up with the mini portrait template and mini Female Face stamp set. The pixie ears are from the new profile face mini stamp set


I made up the head dress using the Folk Fabrique Stamp Set and i coloured it in with Artiste Water colour pens 


The fair was made with the Rag Tails Mini Portrait Template  which i coloured in with First Edition Marker Pens.


The top was coloured in by blending Pan Pastels together and i used the Folk Fabrique Stamps to add a pattern.

Trimcraft Scrapbook Feature December The Christmas Market

hi all

I am back with my latest layout for the Trimcraft Scrapbook Feature.
You can fond the full tutorial here http://www.trimcraft.co.uk/


I used the First Edition Christmas Wishes pads for this project and fund that the nordic patterns work with my photos from the Birmingham Christmas Market


             I used the new poinsettia dies set and clustered them together with paper blossoms


I decorated the page with lots of adhesive gems and pearls


                                                          Thank you for visiting


Wednesday, 16 December 2015

Readers Design Team Quick Cards Made Easy issue 147: New Year's Cards


Hi all
I have been asked to design a card for the Quick Cards Made Easy Customer Design Team for their January Issue. I used the free papers from issue 147 to create this card below and one other card that will be on their Facebook Page. You can get the papers free here http://www.cardmakingandpapercraft.com/download/new-year-party-bonus-papers


I like the  tags which can be used to quickly whip up a few cards.


I added lots of sparkle to the card 


Here is my card i sent in 


You can see more card design on the Facebook page here https://www.facebook.com/QuickCardsMadeEasy/