Followers

Tuesday, 29 August 2017

How To Create A Stunning Heritage Page


1) Paint a section of the page with soft pink acrylic paint, use a brayer to create a blended look.

2) Apply a stencil with modeling paste.

3) Paint over the top with purple ink and add small amounts of ink around the layout.

4)  Stamp around layout with a texture stamp

5) Cut a strip of pattered paper and add gesso over the top, Add a little yellow ink and stamp over with a texture stamp. 

6)  Adhere the large strip to the page.


7) Cut a large rectangle out of patterned paper and adhere over the strip.

8) Mount your  photo onto  the pale blue paper and trim to size, Adhere this near the center of the layout.

9) Decorate the page with strips of hessian, Flowers and buttons.

10) Use a sentiment topper as a title.


Thank you for visiting


Sunday, 27 August 2017

How To Create A Dream Catcher Mixed Media Tag

Hello crafty friends

I have another mixed media tag to share and i have been playing with one of the new dies  that have just come into the shop this month. This one is the Dream Catcher  and is a two part thin metal die that should work on most die cutting machines.


I started off by using Brusho powders to  create the background by mixing a  few green and blue inks together. I then applied a stencil using modelling paste and dry brushed silver paint over the top and then added a few texture stamps.


I cut both parts of the die out using the blue wood effect paper from the Summer Feelings 6 x 6 paper pad and then spritzed with blue in and  dabbed over the top with blue metallic paint.


I finished off by adding some fibers and pearls to the tag.

Thank you for visiting


Learn How To Make A Fantastic Dream Steam Card

Hi all

I have a card i have made up using the new Dream Steam Collection by Fabscraps


Cover a 6 x 6 square blank with a sheet of the Dream Steam paper. Add a large printed tag to the center and then cut some painted dry wall tape and glue to either side. Tutorial is here https://whatkatiedid2.blogspot.com/2017/06/how-to-create-grungy-textures-using.html


I used the cog stamps by Gummiapan and stamped them out onto white card. I used bright colours to match the paper and i just layered them up. Use foam pads to raise some of the cogs and then slot a few underneath.


Thank you for visiting


Saturday, 26 August 2017

How To Create The Wisdom Art Journal Page

Hello all

I am back on the blog today with a new art journal page. I went with water as this month's theme is Nature. 


I created the background by adding a few blobs of Blue and Purple Aztec Metallic Luster to a Gelli Plate and then blending them with a brayer. Next i placed a sheet of paper from my pad over the top and smoothed it down to cover the page with paint. I mixed Turquoise with  modeling paste and applied it to a stencil across the page. I then added drywall tape around the page and painted gesso over it and added gesso to the center of the page. I added stamps and then another stencil but used Sea Green with modeling paste.


I printed out the images onto smooth card and painted them by mixing a little powder with a water pen and using it like a water colour. I then cut out the images and glued them into place.


I printed out the sentiment and cut it to fit the page. I then painted it over with Sea Green so it fit in with the other colours.


Thank you for visiting


Wednesday, 23 August 2017

Colourcraft Design Team Project preview Halloween Birdhouse


Hi all

Halloween is that time of year i can let my weirdness out of its crypt. Check out my project over on the Colourcraft team blog


Visit if you dare !!

Monday, 21 August 2017

How To Create An Inspirational Journal Page

Hello crafty friends

Learn how to create this bright art journal page using SinCity Stamps.

Product list

White Card Stock
Green ink
Blue ink
Green Ink pad
Black ink pad
Modeling paste
tissue paper
blank journal


Paint a blank page with lime green ink and then apply a stencil using modeling paste.
Use the Hearty Doodles Stamp to add a few circles to the background with green ink.
Stamp around the edges with a texture stamp using black ink.


Stamp out two hot air balloons from the Hot Air Balloons 3 stamp set. Colour them in with inks and cut out. Adhere the detailed one into the bottom left corner of the page and the large balloon at the top right corner. Apply a stencil over the top.


Stamp a sentiment onto tissue paper and carefully glue into place


Stamp out a few flowers onto white card and colour in with inks. 
Cut them out and adhere to page.
Cut a few of the petals out and dot around the page.


Thank you for visiting

Saturday, 19 August 2017

Learn How To Create This Stunning Sea Side Layout


Hi all 

I have a new layout made using the lovely Summer Feelings collection available at Cherish the Memory.


Start off by mounting the photo to a background and trimming it to fit. Mark out where the photo will be on the layout  and then apply gesso using a palette knife. Next apply a stencil using black modeling paste and once it has dried, Spritz with Turquoise and sea green mist sprays.


Apply stamps around the layout and then take a few sheets from the matching 6 x 6 paper pad and cut into strips. Place the strips into position and glue down once you are happy with the layers. I added  die cuts and bits cut out of the empheria sheets.


I added some cheese cloth around the edges of the page and added micro beads with a little more blue ink on top. I spritzed some white flowers with blue ink and added them to the page.


I finished the page by adding a title and a few half pearls.

Thank you for visiting


Thursday, 17 August 2017

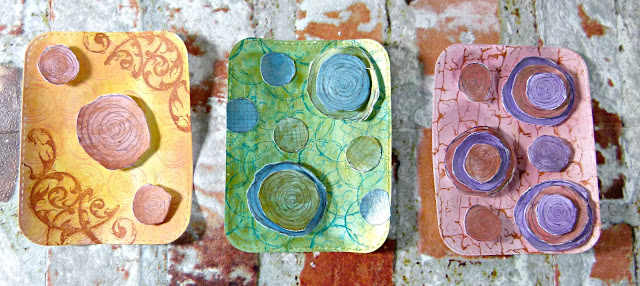
Grungy Textures ATC Set

Hi all

I have a few quick ATCs to share using the new Background Grunge stamp set by Pam Bray.


http://sincitystamps.com/background-grunge-art-rubber-stamp-sheet-designed-by-pam-bray-scpbr-001/


To create the backgrounds, Add paint and then stamp textures over the top.


Stamp out the circles onto card stock and colour them in before adhering them to the ATCs.


Create different style of ATC by changing colours and combining different texture stamps.

Thank you for visiting.


Stencil Girl and ColourCraft Blog Hop Giveaway


Hi all

We are doing a blog hop with Stencil Girl so come hop along for a chance to win some prizes.

Start here at our team blog  https://colourcraftblog.blogspot.co.uk/

GIVEAWAY
One lucky winner will receive both a $25 Gift Certificate to StencilGirl Products
AND a $25 Gift Certificate to Colourcraft!
Visit the fabulous designers from both teams and comment for your
chance to win!
The more blogs you comment on, the more chances you have to WIN!
(One comment per blog please.)
You have until Sunday, August 20th at 11:59PM Central Time to leave your comments.
Winner will be announced on
StencilGirl's Facebook page and Colourcraft’s Facebook page
on Monday, August 21st.
4


Here Are Today's  Blog participants 


Katie Lamb You are Here

In case you missed it !!


Take a blank card and cover with the Journal Texture 2 using modeling paste and leave to set. Next spritz card over with water and then sprinkle over with Brusho powder. I used Rose Red and Lemon which created this ombre effect.


I then cut out a flag and added Rose Red Brusho powder over it and once dry i used the Starlight stencil over the top. I then mixed some Lemon Brusho Powder with modeling paste and applied it over the flag using the Journal Textures 6 stencil. I glued lace across the top and then stuck it down.


I used pink bakers twine and wrapped it around the top of the card and added a flower to the corner of the flag.


I finished off the card by stamping out a sentiment onto card and painted Lemon Brusho powder over the top before adding it onto the card. I added sequins to finish.


I am also entering this card in the That's Crafty Only Cards Challenge http://thatscraftychallenges.blogspot.co.uk/