Followers

Saturday 29 April 2017

How to Create an Inventive Masculine Card


Hi all

i have a steampunk themed card to share today using the Industrial collection from Cherish the Memory. 


Cove a square blank with a sheet of the industrial paper and trim to fit. 
Next take a stencil and apply modeling paste over it. 
Spread this in the corners and down the middle of the card and leave to dry. 
Sprinkle Moss Green Brusho Powder over the embossed areas and wet using a water pen. 
Dry brush over the embossed area with copper paint.


Cut out two squares from the industrial paper and layer them together. 
Then cut a few strips from the papers and adhere to the centre of the card.
Next make up one of the decoupage toppers and adhere to card. 
Decorate the card with a sentiment and cog charms,


The Industrial Collection

Thursday 27 April 2017

Wednesday 26 April 2017

Cherish the Memory On Your Bike Scrapbook page

Hello  crafty friends

I have a new layout on the blog and my first project for Cherish the Memory. This is an old family photo of my Grandad from the late 50's.


1) Place photo onto background page and mark out position with a pencil

2) Apply gesso around the space using a palette knife.

3) Apply a stencil to the background with modeling paste.

4) Spritz with sepia ink.


5)  Spritz water onto small sections of the background and sprinkle over with Gamboge and Terracotta  Brusho powder. Leave to dry before applying next colour.

6) Sprinkle Cobalt Blue Brusho Powder and use a water pen to guide the colour around the embossed sections.

7) Finish background by dry brushing over with metallic paint.

8) Mat Photo onto card stock and trim to fit. Use 3d foam tape on the back to raise it off the page.

9) Cut up sheets from the 6 x 6  pad and play around with the position before sticking down. Use 3d foam tape on the main layers so you can slot more pieces under later.

10) Pop out the pieces from the die cut sheets and adhere around photo. Tuck a few in between the layers to bulk it out.

11)  Fold the corner over on one of the layers and fasten with a brad, Tuck die cuts and paper twine behind it and hold in place with glue.

12) Decorate the page with cog charms.

Thank you for visiting

Sunday 23 April 2017

How To Create A Bee Themed Shaker Card Using Bee Garden

Hello crafty friends

I have a new tutorial showing you how to create a shaker card using the new Bee Garden Collection


Products used


Dovecraft Craft Foam

Dovecraft A4 Acetate

Aztec Eco Metallic Lustre

Hexagon Nesting Die

A Bit of Washi Tape


1) Cover a square card with a sheet of paper.

2) Cut a sheet of the kraft card diagonally and glue to corner of the card.

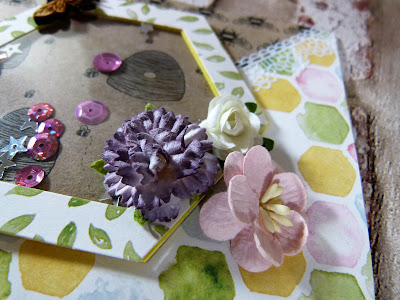
3) Glue the shaker box onto the card and decorate with flowers and a wooden bee.

4) Place dry wall tape onto a non stick surface. 

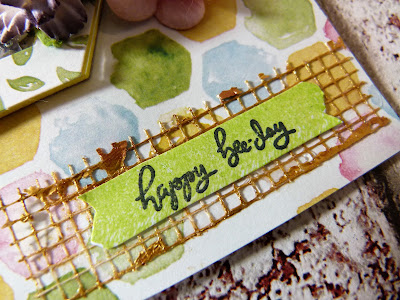
5) Paint with metallic gold paint and leave to dry. 

6) Peel off the dry wall tape and cut to fit

7) Stamp out the solid washi tap stamp onto card. 

8) Carefully stamp a sentiment onto the washi tape and glue to dry wall tape before adding to the card.

How to create a shaker box


1) Take two nesting die shapes and position onto craft foam. 
Hold in place with washi tape.


2) Repeat step one with a sheet of patterned paper. 


3) Use the larder die out of the two and cut one kraft card and one using acetate.


4) Glue the large foam cut out onto the kraft card base.

5) Add the sparkly sequins 


6) Glue the acetate over the top and leave to dry


7) Glue the  hexagon frame over the top of the acetate.

Thank you for visiting


Saturday 22 April 2017

Sin City Stamps Inspire Mixed Media Tag


Hello crafty friends

Learn how to create this mixed media tag using Sin City Stamps.


Products


Gelli Plate

Assorted Blue Acrylic Paints

Blue Embossing Powder

Blue Ink Pad


1) Use a gelli plate to create the background with paint and ink.

2) Use the random letters stamp around the edges and emboss with blue embossing powder.

3) Stamp another layer of texture stamps over the top and add a stencil.


4) Coat with a stencil using modeling paste and leave to dry.


5) spritz with misting ink and leave to dry.


6) stamp over the top again with the random letter ink


6) Take one of the inked up baby wipes and let it dry out. Cut up into strips and glue to tag.

7) Add another texture stamp from the Art Journal set. 

8) Stamp out the wings onto painted or inked paper and cut out. 


9) Finish tag off with a word charm and a few cabochons  

Thank you for visiting.