Followers

Monday, 30 June 2014

Docrafts monday: A shabby chic sewing kit


Hello and welcome to my blog, today I am sharing with you a mini sewing kit I made using Docraft's products 
the box was made by cutting out two large rectangles using the xcut nesting die. I stuck the two halves together and cut an inch off the bottom. I then folded over leavening about two inches showing on the bottom. I made two creases parallel to each other and folded up the bottom to make the flap.
The rose I made by following a Tutorial from Becky Jame's blog http://rebeccajamesdesignstudio.blogspot.co.uk/
I made the button card by cutting out one of the Madame payraud's note cards with the small square nesting die and gluing buttons to it.

I used the cousins bead sets and glued them in place with a glue gun I then glued them in place using hot glue.

Thanks for visiting

Heat Embossing mini tutorial: Creating Glossy Accents

                                  Technique glossy accents

Through out the year I will be posting a few mini tutorials teaching you some basic techniques and today we are following on from the beginners guide to heat embossing.

    
first of all you need to stamp out your image using pigment ink or watermark ink. The Artiste watermark ink is like the versa mark in from Wow embossing and I like to use this type of ink because it is sticky and holds the powder well.


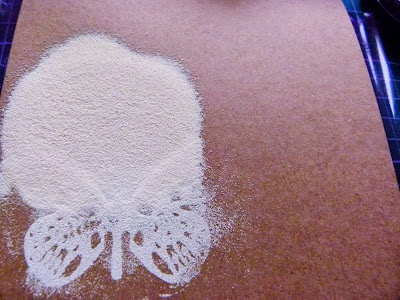
cover it over with clear embossing powder


                                           tap off the excess and then heat with your heat tool, it is always a good idea to have a tray as you don't waste as much powder and these aren't cheap.


rub the image over with a watermark ink pad and coat in clear embossing ink before heating it up. repeat until you have a thick glossy coating.

Thursday, 26 June 2014

A Beginner's guide to heat embossing

Today I am going to teach you the basics of using heat embossing on your projects.

First of all you can heat emboss on anything that will hold high temperatures such as wood, acetate and card. if you are not sure if you can heat emboss on something then test a small area of the material first.


lets look at some of the equipment you will need.

 To heat emboss you will need a heat tool not a hairdryer as the force of the air coming out of the hairdryer will blow the power off the project and not infuse the embossing powder, also a hairdryer does not concentrate the heat in one area which leaves an uneven effect,trust me I tried doing it the DIY way then had to buy a heat tool which you can buy from around £15.

You will need to use a ink to hold the powder on to the project, use pigment inks as these are sticky and slow drying. If you use a normal ink pad then the powder will only stick to part of the image or dry before you can heat the powder. You can use any coloured pigment ink or use a clear embossing ink which is invisible until you pour the powder over it.

Then there is the main product, the embossing powders of which there are many different colours and brands and it's up to you to find ones you like. In this tutorial I have used the Papermania embossing powders.

If you use a tray such as the Anita's clear away tray, then you can capture any spilled powder and pour it back into the tub. You can use a piece of folded up card but eventually this gets messy as powder and ink will stick to it. A selection of different sized acrylic stamping blocks will allow you to use  a block that fits your stamp correctly and this allows you to apply a even amount of pressure on the stamp.

Now on to your first technique which is very basic.

                               
                 1) Take your stamp and ink it with clear embossing ink. You can't see this ink so you need to dab it all over the stamp to make sure you have covered it completely.


2) Place your stamp into position and hold the block still with one hand and apply pressure by pressing down all over the stamp with the other. By using this method you stop the block from rocking and causing the image to smudge.


3) Place the project over a tray and pour the embossing powder over the stamped area. You should see your image appear as the powder is poured off it.


4) Give it a firm tap against the base of the tray to remove any excess powder.

5) Place the project onto a flat surface that is heatproof and then heat the powder with a heat tool.  As you move the heat gun over the powder It should change colour and turn shiny.


6 ) You can leave the embossed image as it is or  you can spritz it with spritzing ink and then dab off the excess ink with a paper towel.


Thank you for visiting and please leave a comment if this tutorial was helpful or if you have any questions


Wednesday, 18 June 2014

Life in a Smashbook:Curiosities

Here it is a page I completed in my mini album, I had a lot of old photos and vintage printouts to had and decided to stick them in the book. here is a great site for free vintage pintables many of which I have used here. http://www.ephemerasvintagegarden.blogspot.co.uk.

 ive  added another little trinket box which I will share when its complete.
 this little trinket box was made with the Tim Holtz matchbook die, I covered it with a vintage printout. I added elastic inside to hold the garland in.
 I made a clasp to hold It shut by taking a small paper clip and gluing a metal embellishment on top. I aged the metal by mixing silver and copper embossing powder together and heating it up. I used watermark ink to hold the powder on.


the garland is made up of thick twine and print outs. I just glued the two sides together with the twine in the centre. I added some button die cuts made with Kraft card.

the items would be a bit awkward to open up and look at if they were adhered to the page. so I used magnetic tape to adhere them. it works out around £1.25 a meter.


the mini album was made using the sizzix framelet dies and I just left a gap over the edge of the folded paper so that it would come out joined together.
 I spent ages inking the pages with vintage photograph distress ink.

I used the xcut sewing patched die to make the bobbins and wrapped twine around them.

Monday, 16 June 2014

The Memory Nest Make it Monday no 19

Its time for a new challenge over at www.thememorynest.blogspot.co.uk.  all who enter have a chance to win a prize.
Leo is a mischievous little thing who likes to boss us about and steal the bed for himself. I had a lot of scraps to use up and thought that using a patchwork of hexagons would help me get through them. I used one of my American crafts paper pads which seem to last forever.

Monday, 9 June 2014

Smashbook: La de dah 1


Here is page one of my La De Dah smashbook. I will try to create a new page every week as a personal challenge to myself to get my photos into an album of some description. for those of you who have never herd of a smashbook, its basically a less formal way of scrapbooking and doesn't have to use photos either. Some people use them to keep packaging and tickets in because they like them while others use them to keep drawings and art in. Mine will be a random assortment of photos.

 The La de dah range come In 3 styles couture, pretty and journey. My book is the journey one and its more like a ring binder as you can remove the pages and add new ones. this is great for customising pages and covering over the patterns you don't like. I like the idea of having interactive pages and will design some with pocket and flaps latter but this week its a simple mini layout.
I been experimenting with stamps this week and I used the new photopolymer stamps from Trimcraft. I like these because they are made from a thick rubber and hold the ink better then the acrylic stamps.

Saturday, 7 June 2014

Ahoy there! Random blog post of the week

Summer is here but for how long? if I know how our weather is then it will be snowing next week followed by several months of rain.

 Here is my latest layout I wanted to share with you. I was experimenting with hexagons and I like how it has turned out.

 I have used no less then 8 different die-cuts on this layout. Marianne creatable Shells, anchor and Lighthouse. Xcut hexagon nesting dies, sizzix framelits polaroid frames, joy crafts flags and pennant dies, Joycrafts nautical buttons and Tim Holtz once upon a time alphabet die. there is most likely a therapy group for people like me.

Friday, 6 June 2014

The Memory Nest Make it Monday no18

We have a new sketch up at www.thememorynest.blogspot.co.uk for you today. Don't forget to link your projects up so the DT can leave you some comments.


I've recently been to Great Yarmouth and came back with loads of seaside photos, so I did a nice beach themed layout using American crafts  Dear Lizzy Lucky Charm papers and Papermania Ahoy there.
 It was a warm and sunny weekend break, I even got to use the sun cream. the thing with Yarmouth is that unless you travel a long distances it can get a bit repetitive walking around the resort. I am a bit more adventurous and like to go out and explore so I did well staying in one place for 3 days.

I just grabbed a load of bits and pieces I had hanging around and stuck them on the layout. the little shell dies are Quickutz cookie cutter dies. I've had them a while but never used them that much.

I've been trying to use that wave die for ages.

Journaling is an important part of your scrapbooks and it gives you the opportunity to talk about things you can not see in your photos. incorporate the five senses into your writing to bring those memories to life. I take an A5 note book on my travels so I can jot things down and keep things I;ve collected in it. it helps when you get back home and start putting things in to an album.


I used the Joy Crafts flags die to make the bunting which is one of my favourite dies. most of this layout was made with my older stash which I am still trying to use up. I might sneak another American Crafts paper pad in depending on whether TK Maxx has had a new load of stock in.