Followers

Wednesday, 30 November 2016

DecoArt Blogger Outreach Program: Art Journal Spread You Wings Layout

Hi all

I have a new art journal spread to share. I have been practicing with this area of mixed media for a couple of months and it is getting there slowly. 


i started off by covering both pages with white gesso. This covers up any marks on the pages and stops inks soaking through. I then choose three shades of green for the background which are Early Spring Green, Citrus Green and Ocean Green. I painted the pale color over the pages and then while it was drying i went over the edged with Citrus and Ocean green.


I then stamped around the edges with Frayed Burlap Distress ink and used the Lost Coast Designs  Grunge ATC Background Stamps Set. I then used a pale blue acrylic paint and covered sections of the stamps and stamped them randomly along the edges and page. I like the textures to be imperfect and a bit faded.


I used the DecoArt Spirited Urban Ink stencil with white modeling paste to add the focal points and lettering.


I went over the stencil with Turquoise Metallic Lustre once it had set to bring the design up a bit more.

Thank you for visit


Tuesday, 29 November 2016

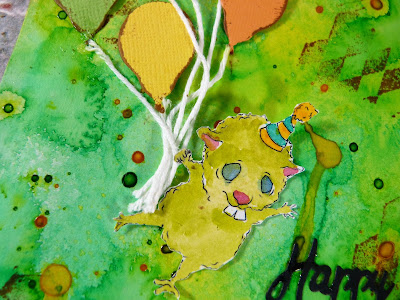
Whisker Graphics November Up and Away Birthday Card

Hi all

I have a new mixed media card to share which i started off by spritzing ink over a blank card and letting it dry.


I colored in the little Guinea pig with Prima Watercolours and you can find him on the Blooble etsy site.


I used a die cut for the balloons which i cut from textured card stock and inked before gluing strands of Solid White Twine to each one to create a bunch of balloons that are lifting him away.


Whoosh off he goes

Thank you for visiting


Tuesday, 22 November 2016

Sin City Stamps Design Team Application


Hi all

This is my application for the Sin City Stamps Design Team Call.


Art Journals


Decoart white modeling paste
Decoart white gesso
Dry wall tape
Kaisercraft  Texture Stamps Edges, Film Edges,36
7 Gypsies Steampunk set
Lillli Bot Crafts Gothic Rose Stamp Set
Banana Frog Alphabet stamps
13arts Yellow green Mister
Colour Chemistry Sepia mist spray
That Craft Place Clock Stencil


DecoArt crafters acrylic island blue
Clearsnap Colour Pop Minis Kiss, Night, Fresh, Black and Ice
Susan k Weckesser Co Branded Unity A Little Bit Love Stamp Set
Julian Vance Grunge Love
Tando Creative Mini Sequin stencil
DecoArt Pixlated Stencil
Susan K Weckesser Doodles Stencil
DecoArt Black modeling paste
DecoArt white modeling paste

Mixed media card


DecoArt Scale 12 x 12 Stencil
DecoArt Media Mister Magenta
DecoArt Pixlated Stencil
DecoArt White Modeling Paste
Kaisercraft Crackle Stamp
Kasercraft Harlequin Stamp
Prima Rossibelle Paper Collection

Altered Steampunk Lamp


DecoArt Chalky Finish paint Lace 
DecoArt Chalky Finish Treasure
Oak House Studio Colour Chemistry Sea Blue
Oak House Studio Sea Life stamp set
Things to Alter MDF Anchor 4 inch 
Things to Alter MDF Cogs and Washers
One Old wooden Lamp

ATC


This one hasn't been blogged yet so here is a tutorial on how to make things look rusty


MDF ATC blank from Things to Alter
MDF cogs Things to Alter
DecoArt black and white gesso
DecoArt Metallic Lustre Turquoise, Rose Gold and Copper Kettle
DecoArt Crafters acrylic Oatmeal


Mixed Media Art Journal The Beginning


Hi all 

I have a new art journal to show you and i have included a tutorial too. I have been spending time developing my mixed media style and i am going towards bright and grungy which is going to be interesting.


I started off by applying texture using stencils and modelling paste which i applied around the edges. I then painted the whole page with white gesso and added bits of dry wall tape. You need to add more gesso over the tape as it is smooth.


Next i painted the pages over with Crafters Acrylics starting with Oatmeal and then building up the paint layers using Early Spring green and Island Blue. I blended the colours together and then spritzing misting ink over. I applied some with a brush to get darker patches of ink.


I then used the Kaisercraft Edge stamps to build up a boarder and added texture around the edges.


I used the Kaisercraft 36 stamp to build texture up starting from the top corner


I stamped the skull onto the page first as a place mark and to get the details on the page that would be lost in the next step. I stamped the skull onto white card and cut it out before adhering it to the card and added some cogs.


I highlighted the stencils by dry brushing paint over them and the dry tape.


I finished the layout off by stamping my quote out onto card first and then cutting the words out. I did this so i didn't accidentally smudge them words on the page.


Crackle Effect Tag Tutorial


First choose your base colour. I choose one darker then the top layer so it 
shows through.


Cover the tag in the base colour and leave to dry


Once the base coat is dry, add a thick layer of PVA glue over the top


Now paint your top layer over the wet PVA. The thicker the layer of PVA the 
bigger the cracks


This is how it should look once dry


Thank you for visiting

IKE's Art November Thanks Giving U/sing Rustic Digi Stamp

Hello all


I am back with another make for the IKE's Art team.  This week the theme is Thanks Giving so here is a card complete with turkey


                                                    Is it just me or are turkey's just really ugly? Anyway i choose the Rustic digital satmp  because it has been awhile since i had a turkey dinner and i think that is a big part of Thanks Giving that and soccer.


Nothing can beat a lovely roast. Is this card making you hungry? It's making me hungry.


Thank you for visiting

Monday, 21 November 2016

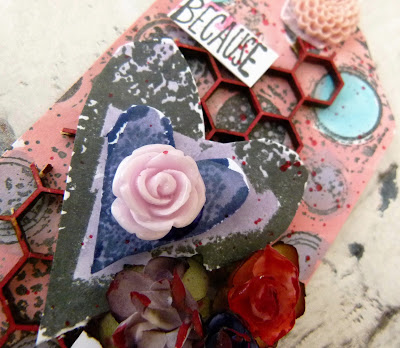
Susan K Weckesser Creative Team Because I Care Tag and Video


Hi all

I have a quick video for you. It is showing you how to mix and paint with the new Clearsnap Color Pop Mini inks designed by Susan K Weckesser. 


Here is the finished tag. I was going to do a full video but i'm very new to making them but it is something i will keep working on.


I started off by stamping over a white tag with In Circle Me background stamp and then i mixed the white and red inks to make a salmon pink. I painted this on to the background and left the circles blank for now.


I colored in the circles with Ice Blue and mixed Navy Blue and Red together to make purple.


I painted up the MDF mask using DecoArt Fluid Acrylics Magenta and glued it to the tag before coloring in two hearts from the Grunge Hearts stamp set.


I then dribbled some of the magenta paint over the paper flowers which i inked with the colour pop inks. I miked the inks with water and painted them. I used the sentiment from the Bunny Hugs stamp set.

Sunday, 20 November 2016

Artful Days November Box Reindeer Christmas Card Tutorial


Hello crafty friends 

I am guest designer for Artful Days this month and the goodie box theme is Christmas. If you want to grab you box there are a few left. http://www.artfuldays.co.uk/ourshop/


The 6 x 6 papers are from Echo Park and they are gorgeous.


Take a 6 x 6 sheet of paper and tear around the edges. Don;t worry about being neat as this adds texture. Adhere this onto one of the embossed card blanks.


Cut a silver doily in half and adhere to card. Next take one of the 6 x 6 papers and cut a 6 x 2 strip and adhere it over the doily before trimming to fit.


Cut a 3 x 5 rectangle and adhere over the strip


Take the other half of the doily and place it over the larger rectangle.
Cut another smaller rectangle and place this over the larger one.


Take one of the torn sides from the first layer and place over the top of the small rectangle.


Cut a strip 2 x 4 and place across the center of the card.


Paint the wooden reindeer. I used black gesso for the first layer and then added crackle paste to it which i tinted with gold paint.


Decorate the card by clustering the poinsettia and berries around the card. Finish off by adding a sentiment topper.

Here is the finished card


Thank you for visiting

Thursday, 17 November 2016

Trimcraft Christmas First Edition A Christmas Story


Hi all 

I have a couple of Christmas cards i made up using the First Edition A Christmas Story paper pad.


I added one of the Gold doilies from the Dovecraft Basics collection and just built up from there.


The little stick on poinsettias are part of the Winter Blooms collection and are made of mulberry paper. 


Same paper collection but this time i painted up a mdf word and used it as a sentiment.


I wanted to give it a rich feel so i added red and green gems from the Dovecraft Basics collection


Thank you for visiting